
Have you ever stepped outside to admire your home only to find strange, bubble-like blisters popping up across your siding? It’s a frustrating sight that leaves many homeowners wondering if their last painter made a mistake or if wood rot is hiding beneath the surface. You aren’t alone in that feeling of worry. In our unique Pacific Northwest climate, these bubbles are often a sign that moisture or heat has become trapped where it doesn’t belong. Understanding the specific causes of paint blistering on exterior walls Vancouver WA is the first step to restoring your home’s curb appeal and protecting your investment.
Is this a project you can tackle yourself, or do you need a professional house painter to step in? We’ve got the answers you’re looking for. In this guide, you’ll discover exactly why your exterior paint is bubbling and learn the professional steps to fix the damage. We’ll also share local secrets for preventing those blisters from returning once the next rain season arrives. We’re here to help you move past the confusion and toward a solution that lasts. Let’s get your home looking its best again.
Key Takeaways
- Identify the visual differences between minor surface “pimples” and deep adhesion bubbles to understand the severity of your siding’s condition.
- Pinpoint the specific causes of paint blistering on exterior walls Vancouver WA, ranging from trapped internal moisture to applying coatings over damp morning surfaces.
- Use the “Peel Test” and wall location analysis to diagnose whether heat or moisture is the root cause of your peeling paint.
- Master the 48-hour drying rule and proper mechanical sanding techniques to ensure your repairs survive the next Pacific Northwest rain season.
- Understand how a professional painting contractor uses expert preparation and warranties to provide long-term protection for your home’s exterior.
What is Paint Blistering and Why Does it Happen in Vancouver?
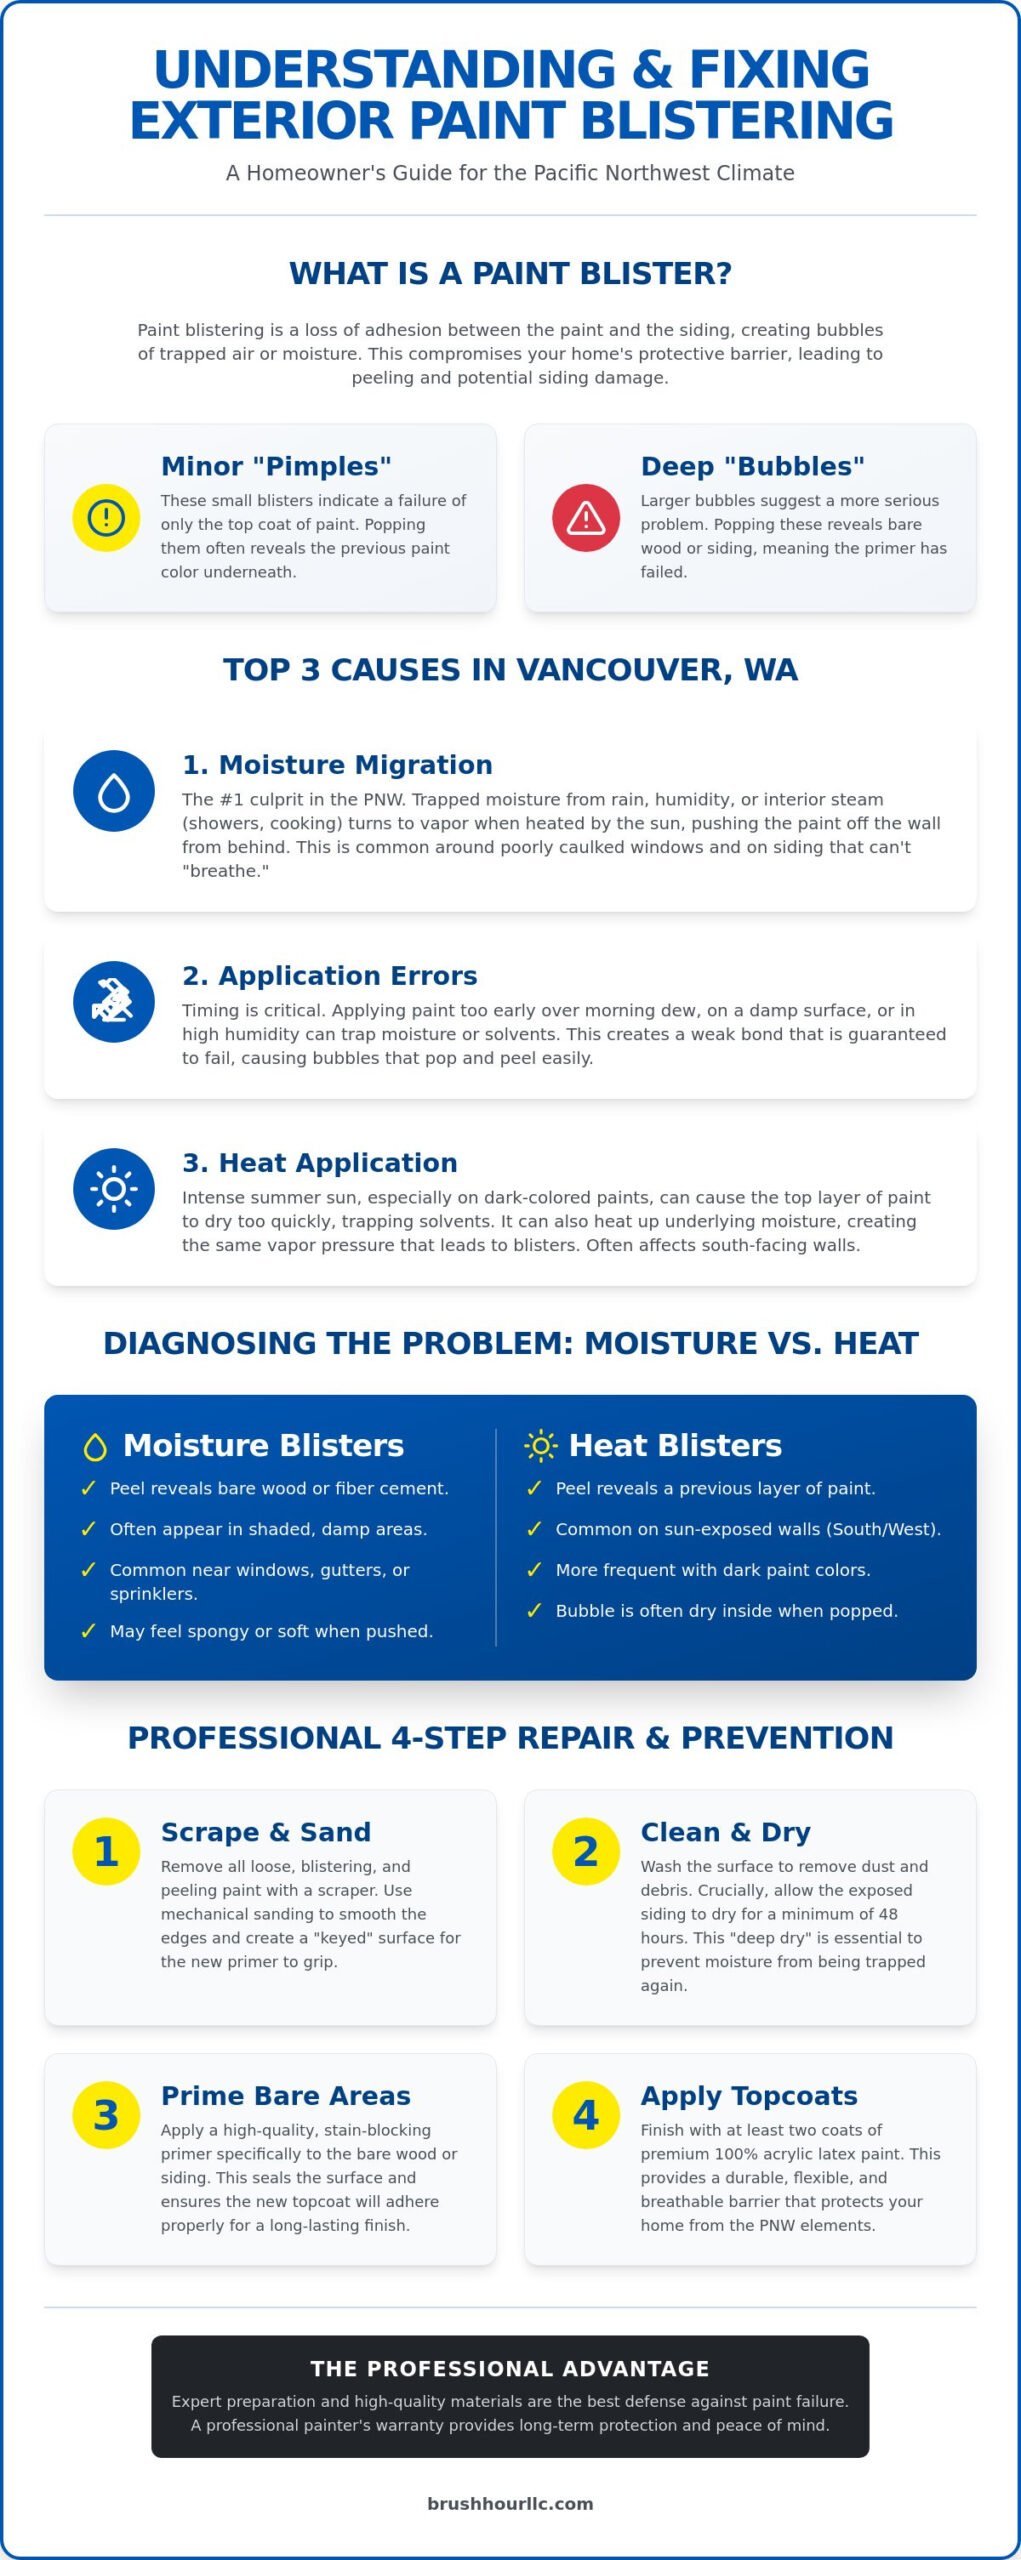
Ever wonder why your home’s exterior looks like it’s breaking out in a rash? That is paint blistering. In simple terms, it’s a localized loss of adhesion between your paint and the wall behind it. Instead of a smooth, protective shell, the paint pulls away and forms pockets of air or water. You might see tiny “pimples” the size of a pea or giant “bubbles” that look like they’re about to burst. Understanding the specific causes of paint blistering on exterior walls Vancouver WA is vital because our local weather plays a massive role in how these failures develop.
When the bond between the paint and the substrate breaks, it creates a visible blemish that is more than just an aesthetic eyesore. It is a sign that the protective barrier of your home has been compromised. If left alone, these blisters eventually crack and peel, leaving your siding vulnerable to the elements. This type of paint failure is often driven by vapor pressure, where moisture or heat forces the paint film to expand and detach from the surface.
The Anatomy of a Paint Bubble
Your paint job is actually a multi-layered system. It usually consists of the siding material, a primer, and one or two topcoats. When a blister forms, the bond between these layers snaps. Have you ever popped a bubble and seen the previous color underneath? That means only the top layer failed. However, if you see bare wood or fiber cement, the primer itself has lost its grip. This often happens because the siding wasn’t truly ready for paint. Even if the surface feels dry to the touch, the core of the material might still be holding onto moisture. Professional painters know that “surface dry” and “deep dry” are two very different things.
Vancouver’s Climate: The Perfect Storm for Blisters
Why is this such a headache for us in the Pacific Northwest? It comes down to our high annual rainfall. During our long, wet winters, water finds its way into microscopic cracks in old caulking or around window trim. Your siding acts like a sponge, soaking up that moisture for months. When the sun finally breaks through in the spring, it creates a “solar drive” effect. The sun heats the surface of the siding, turning that trapped liquid water into water vapor. This gas needs somewhere to go, so it pushes outward with immense pressure. Since the vapor can’t easily pass through modern paint films, it simply pushes the paint away from the wall. This is exactly why many homeowners notice a sudden “bloom” of blisters right as the weather starts to clear up in April or May.
The Top 3 Causes of Paint Bubbles on Pacific Northwest Homes
Why is your siding bubbling? In our corner of the Northwest, it usually boils down to three main culprits. While general guides talk about “bad paint,” the reality of the causes of paint blistering on exterior walls Vancouver WA is much more localized. It’s often about the battle between Washington’s humidity and your home’s ability to breathe. Let’s look at the first big issue: moisture. It isn’t just about the rain hitting the outside of your house. Sometimes the problem starts from the inside.
Moisture Migration: The Hidden Enemy
Have you considered your bathroom fan lately? Steam from hot showers or boiling pots in the kitchen doesn’t just disappear. If your interior vapor barrier is weak, that moisture travels through the wall and gets trapped behind your exterior paint. In Vancouver, we also deal with failed caulking around windows. Our wet winters let water seep into these gaps, saturating cedar shingles or T1-11 siding. Sometimes, we even recommend “siding wedges” to create a small gap. This lets the house breathe and prevents water from being locked in where it can cause damage.
Application Errors During the “Painting Window”
Timing is everything in the Pacific Northwest. If a painter starts too early on a humid Washington morning, they might be applying paint over a thin layer of dew. This is a recipe for disaster. When oil-based coatings are applied over damp wood, they simply won’t stick. We also see “solvent entrapment.” This happens when the top layer of paint dries too fast, trapping wet solvents underneath. This is a common risk when using high-quality 100% acrylic latex in high-humidity conditions without proper airflow. It creates a bubble that eventually pops and peels.
The final cause is heat. It sounds strange for Vancouver, but our summer sun is intense. Darker paint colors like deep charcoals or navy blues absorb a lot of heat. If there’s even a tiny bit of moisture or a previous layer of oil paint underneath, the sun will bake it until it expands into a bubble. This is one of the most common causes of paint blistering on exterior walls Vancouver WA during our July heatwaves. Don’t forget about surface contamination either. Vancouver’s heavy spring pollen and dust can act like a barrier that prevents new paint from grabbing onto the siding. If you’re feeling overwhelmed by these technical details, don’t worry. A skilled painting contractor can help you diagnose these issues before the first brush stroke even touches your home.
Moisture vs. Heat: Diagnosing Your Siding’s Blistering Issues
Ready to play detective on your own home? Identifying the specific causes of paint blistering on exterior walls Vancouver WA doesn’t require a lab coat, but it does require a bit of close-up inspection. When you see a bubble, your first instinct might be to ignore it or paint over it. Don’t do that just yet. The way a blister looks, feels, and where it sits on your house tells a story about why it formed in the first place. By looking at a few key clues, you can figure out if you’re dealing with a moisture problem or a heat-related application error.
The most reliable way to diagnose the issue is the “Peel Test.” Carefully slit a blister with a putty knife and look at the back of the paint film. What do you see? If the back of the paint is clean and you’re looking at bare wood or fiber cement siding, the primer itself failed to bond. This is a classic sign of moisture or a dirty surface. However, if you see an older layer of paint inside the bubble, you have an adhesion failure between coats. This often happens when a new layer of paint is applied over an old, chalky, or glossy surface without proper prep.
Signs of Moisture Blisters
Moisture blisters are often the “slow burn” of home maintenance. They might not show up for months after a project is finished. Look for bubbles near ground-level splash zones, leaky gutters, or areas where your siding meets the roofline. Are the blisters near a bathroom or kitchen vent? That’s a huge red flag for interior moisture migration. These bubbles often fluctuate in size. They might look “fat” and tight after a week of Vancouver rain, then appear deflated or wrinkled once the weather dries out. If you pop one and find damp wood or dark staining underneath, you’ve found a moisture leak that needs to be fixed before any new paint is applied.
Identifying Heat and Solvent Blisters
Heat blisters behave differently. These usually show up much faster, sometimes only hours or a day after the paint was applied. They are typically small, hard bubbles that only affect the topcoat rather than pulling everything down to the bare wood. If your home is a darker color like slate gray or forest green, you’re more likely to see this on south-facing walls that bake in the Clark County sun. This happens because of “skinning over.” The sun dries the very top of the paint film into a hard shell before the solvents underneath can evaporate. Those trapped gases push up, creating a pimple-like bubble. If the blister is only in the top layer, it’s a sign the paint was applied in direct, hot sunlight or that the previous coat wasn’t fully dry.
Professional Steps to Repair and Prevent Paint Blistering
Once you’ve identified the causes of paint blistering on exterior walls Vancouver WA, it’s time to roll up your sleeves and get to work. Fixing a blister isn’t as simple as painting over the bubble. If you don’t address the underlying bond, the new paint will just lift off again within a year. The goal is to create a surface that is clean, dry, and dull. This starts with aggressive scraping to remove every bit of loose material. After scraping, we use mechanical sanding to “feather” the edges of the remaining paint. This creates a smooth, sloped transition so the repair is invisible to the eye once the topcoat is applied.
Timing is the most critical factor in a successful repair. In our damp climate, you must follow the 48-hour drying rule. After pressure washing or a heavy rain, the siding needs at least two full days of dry weather to release trapped water. If you rush this step, you’re essentially sealing moisture into the wood, which is one of the primary causes of paint blistering on exterior walls Vancouver WA. While spot-priming might seem like a quick fix, it often fails to provide the uniform protection needed for Vancouver’s extreme moisture cycles. A full coat of high-quality primer is usually the better investment.
The Prep Phase: More Than Just Scraping
How do we know if a wall is actually ready? We don’t guess; we use a moisture meter. For a lasting bond, the substrate must be below 15% moisture content. If the wood is new or has been sanded down to a fresh layer, you also need to remove “mill glaze.” This is a shiny, compressed layer of wood fibers created during the milling process that prevents paint from soaking in. Finally, always use high-quality elastomeric caulking. This material stays flexible, allowing your home to expand and contract during Clark County’s temperature swings without cracking the seal.
Selecting the Right Coatings for Vancouver
Choosing the right paint is just as important as the prep. We recommend 100% acrylic latex because it is “breathable.” It allows tiny amounts of water vapor to pass through the film without breaking the bond. For problematic areas where peeling has been an issue, specialty “peel-bonding” primers can help bridge the gap and lock down the surface. When it comes to sheen, consider a satin or flat finish for south-facing walls. These sheens absorb less heat than high-gloss options, which helps prevent the “solar drive” effect we discussed earlier. Ready to stop the cycle of peeling? Contact a professional painting contractor to ensure your home is protected with the right techniques and materials.
Why Expert Exterior Painting is the Best Defense for Vancouver Homes
Is it worth hiring a pro just to fix a few bubbles? We think so. While you now know the technical causes of paint blistering on exterior walls Vancouver WA, applying that knowledge while balanced on a ladder is a different story. A professional service doesn’t just slap on a new coat; we look for the root of the problem. We use high-tech moisture detectors to find hidden leaks before we even open a paint can. This is the difference between a “quick flip” job that fails next spring and a multi-stage protection plan designed to last a decade. Why settle for a temporary fix when you can have long-term peace of mind?
A professional warranty is your best defense against the recurring causes of paint blistering on exterior walls Vancouver WA. If a bubble appears next year, we’re the ones who come back to fix it, not you. This methodical approach ensures that your home’s new look isn’t just beautiful; it’s built to withstand the unique pressures of the Pacific Northwest. We take the guesswork out of the process, ensuring every layer from the primer to the topcoat is perfectly bonded to your siding.
The Brush Hour Difference in Clark County
We understand the specific siding types found in Vancouver and Battle Ground, from classic cedar shingles to modern fiber cement. Every material reacts differently to our humidity. That’s why we never rush a project just to get it done. We wait for the perfect “weather window” to ensure the humidity levels are just right for adhesion. Our residential painting near me service is focused on longevity because we’re your neighbors, and we want your home to look great for years to come. We treat your project with the same organization and care we’d use on our own homes.
Protect Your Investment Today
What is the cost of waiting? A few blisters might seem like a small aesthetic issue now, but they are often the first sign of moisture intrusion. If left untreated, that trapped water can lead to wood rot and eventually require full-scale siding replacement. Hiring expert exterior house painters saves you money over the life of your home by preventing these expensive repairs before they start. We invite you to get a professional assessment of your blistering siding today. Let’s work together to revitalize your home and protect it against the next rainy season. Are you ready to see the transformation? Reach out to us at Brush Hour LLC, and let’s get started on a solution that lasts.
Protect Your Home From the Next Vancouver Rain Cycle
Ready to say goodbye to those frustrating bubbles? You now have the tools to identify the causes of paint blistering on exterior walls Vancouver WA, whether the culprit is trapped moisture or intense summer heat. Remember that successful repairs depend on patience. You must wait for that critical 48-hour drying window and use a moisture meter to ensure your siding is truly ready for a new coat. Proper preparation is the only way to break the cycle of peeling and protect your home’s structural integrity.
Don’t let a few blisters turn into a major siding replacement. As specialists in PNW moisture mitigation, Brush Hour LLC is here to provide the expert care your home deserves. We are fully licensed and insured in Washington and take pride in our 5-star local Vancouver reviews. Why stress over the technical details when you can rely on a neighbor who knows exactly how to handle our unique climate? We’ll make the process simple and organized from start to finish.
Get Your Free Exterior Painting Estimate from Brush Hour LLC and let’s start your home’s transformation today. We’re excited to help you achieve a beautiful, lasting finish that stands up to whatever the Northwest weather throws your way.
Frequently Asked Questions
Can I just paint over the bubbles if I scrape them off?
No, you shouldn’t just paint over the area after scraping. While it’s tempting to take a shortcut, simply scraping the loose bits leaves a sharp edge that will eventually lift again. You need to sand the edges until they feel smooth and then apply a high-quality primer. This ensures the new paint has a solid surface to grab onto, preventing those bubbles from returning during the next wet season.
Does the color of my paint affect how much it blisters?
Yes, the color you choose has a major impact on how your home reacts to the sun. Darker colors like deep charcoal or navy blue absorb significantly more heat than lighter shades. This extra heat can bake any trapped moisture beneath the surface, forcing it to expand and push the paint away from the wall. If your home has a history of heat blisters, switching to a lighter color can help reduce surface temperatures.
How long should I wait for my siding to dry after a Vancouver rainstorm before painting?
You should wait at least 48 hours of dry weather after a typical Vancouver rainstorm. Even if the siding looks dry, the wood fibers often hold onto moisture that you can’t see. We always recommend using a moisture meter to verify the substrate is below 15% before you start. Rushing this step is one of the most common causes of paint blistering on exterior walls Vancouver WA, so patience is your best friend here.
Is paint blistering covered under a typical painting contractor warranty?
It depends on the root cause of the failure. Most professional warranties cover blistering if it was caused by poor preparation or incorrect application techniques. However, if the blisters are caused by internal plumbing leaks or structural issues like a failing roof, those are generally excluded. Always ask your contractor for a written warranty that clearly explains what is covered so you can feel confident in your investment.
Why is my paint bubbling only on the south side of my house?
The south side of your home takes the brunt of the Pacific Northwest sun. This constant exposure creates higher surface temperatures, which can lead to heat blistering. If there is any moisture trapped behind the paint or if the previous layer was oil-based, the sun’s energy will turn that moisture into vapor or soften the old paint. This pressure creates the bubbles you see only on those sunny walls.
Can interior humidity really cause the exterior paint to peel off?
Surprisingly, yes. High humidity from your bathrooms, kitchen, or laundry room can travel through your walls if you don’t have a proper vapor barrier. This moisture gets trapped right behind your exterior paint film. Since the water can’t escape through the paint, it pushes the film away from the siding. Improving your home’s interior ventilation—a service provided by licensed professionals like One Hour Heating & Air Conditioning—is often a necessary step to stop exterior peeling for good.
What is the best temperature range for painting an exterior in Vancouver, WA?
The ideal temperature range for painting in our area is between 50°F and 85°F. You want the weather to be warm enough for the paint to cure properly but not so hot that the surface dries too quickly. Avoid painting in direct, intense sunlight on hot days, as this can cause the paint to “skin over” and trap solvents underneath. This is another one of the frequent causes of paint blistering on exterior walls Vancouver WA.
Do I need to replace my siding if the paint is blistering everywhere?
Not usually. In most cases, blistering is a surface-level failure that can be fixed with aggressive scraping, sanding, and the right primer. However, if you find soft, crumbling wood or widespread rot underneath the bubbles, you might be looking at siding replacement. A professional assessment can help you determine if your siding is still structurally sound or if it’s time for a fresh start with new materials.