
Did you know that surface preparation makes up roughly 70% of the work in a professional painting project? It sounds like a lot, doesn’t it? Most people think the magic happens with the brush, but the real secret to a flawless finish is what happens before you ever pick a color. Mastering your interior painting preparation is the only way to ensure your new look doesn’t peel or show every tiny imperfection down the road.
We understand the hesitation. It’s easy to feel overwhelmed by the time commitment or the fear of ruining your furniture and floors. You might be staring at small wall dents and wondering how to fix them properly. You want a home that feels refreshed, not a project that leaves a mess behind. We agree that your home deserves to be treated with care and precision.
This guide from Brush Hour LLC will show you how to handle the prep work so your next project looks flawless and lasts for years. We’ll help you create a clean, organized environment and protect your belongings with confidence. From repairing minor surface damage to making informed choices about your paint and supplies, we’re walking you through the path to professional results.
A clean and organized environment is the foundation of any successful project; for those who want professional help achieving this, Pure Breeze Clean offers specialized services to ensure your home is perfectly prepared for its transformation.
Key Takeaways
- Understand why 80% of a professional-grade finish depends on the work you do before the paint lid even opens.
- Master the “Center of the Room” strategy to protect your heavy furniture and create a clean, organized workspace.
- Follow a proven checklist for interior painting preparation to identify and repair wall “injuries” like nail holes and cracks.
- Learn how the right sanding and priming techniques create a durable bond that prevents your paint from peeling or flaking.
- Evaluate your project’s “Prep-to-Paint” ratio to decide if a DIY approach or hiring a professional house painter is your best move.
Why Interior Painting Preparation is the Secret to a Professional Finish
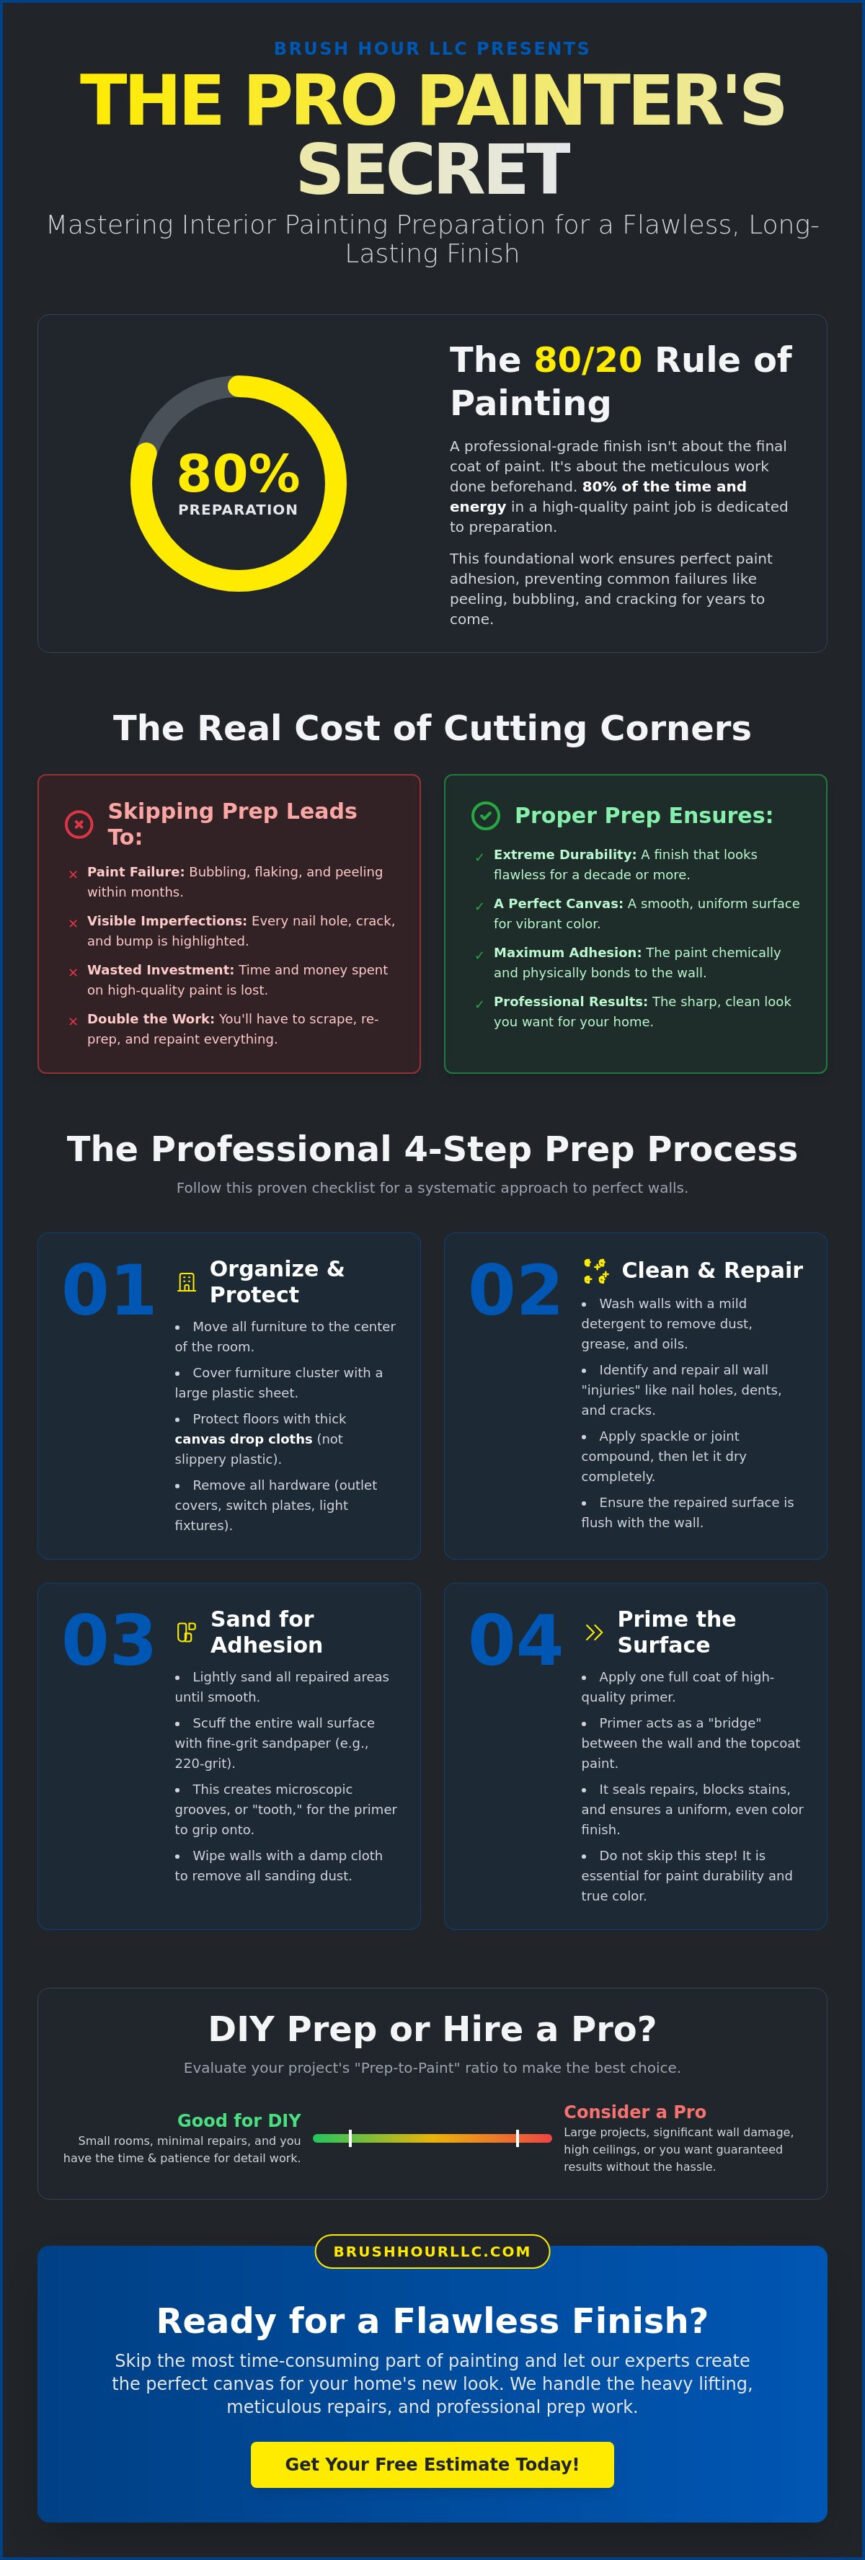
Have you ever wondered why some paint jobs look flawless for a decade while others start peeling within months? It isn’t usually the quality of the paint. The secret lies in the interior painting preparation. In the world of professional painting, we live by the 80/20 rule. This means that 80% of the energy and time goes into the surface before the first paint lid is ever pried open. If you want results that look like they were done by a pro, you have to treat the prep work with the same respect as the final coat.
Think of prep as much more than just throwing a drop cloth over the sofa. It is a systematic approach to cleaning, repairing, and optimizing your walls. When you skip these steps, you are essentially painting over a layer of history. Dust, old oils, and microscopic debris create a barrier that prevents a solid bond. Proper prep stops common failures like bubbling, cracking, and flaking before they even have a chance to start. Beyond the technical benefits, there is a massive psychological perk. Starting your project in a clean, organized environment makes the actual painting process feel smooth and rewarding instead of chaotic and overwhelming.
This focus on the foundation is a principle shared by high-end renovation experts; for instance, the team at merakigc.com emphasizes structural integrity as the key to any successful residential remodeling project.
Understanding the Foundation of Paint Adhesion
Why won’t paint just stick to any surface? Imagine trying to put a piece of tape on a dusty floor. It won’t stay. Your walls are no different. Over time, they accumulate a film of cooking grease, skin oils, and household dust. If you apply fresh paint over this invisible barrier, the paint will eventually pull away. Adhesion is the physical grip between the substrate and the coating. To achieve this, you need to create “tooth.” By cleaning and lightly scuffing the surface, you provide a texture that allows the new layer to lock into place. This chemical and physical bond is what keeps your walls looking fresh for years to come.
The Real Cost of Skipping Prep
It is tempting to skip the sanding and go straight to the color. But “saving time” now is often the most expensive mistake you can make. If the paint fails, you’ll eventually have to scrape off the new coat, fix the original problem, and buy all that paint again. You are protecting your investment. High-quality paints are designed to perform, but they need a stable home. A common homeowner misconception is that “primer hides everything.” While The Professional Touch: Sanding and Priming Techniques are essential for a uniform look, primer isn’t a magic fix for structural cracks or dirty surfaces. It is a bridge between a well-prepared wall and your beautiful new color. Once your walls are properly prepped, you’ll also want to explore the latest interior painting color trends for 2026 to choose a shade that complements Vancouver’s unique light and your home’s character. And if you’re planning to list your property, understanding how interior painting for selling a house can return over 107% of its cost at the closing table makes every prep step an even smarter investment.
Clearing the Canvas: Organizing Your Space for Success
How do you turn a lived-in room into a professional workspace? It starts with smart logistics. Many homeowners dive into the paint too early, only to find themselves tripping over a sofa or hunting for a lost outlet screw. A successful project depends on a clear path. By organizing your space first, you eliminate the stress of working in a cramped environment. This phase of interior painting preparation is what separates a messy DIY weekend from a high-quality transformation.
Start by clearing the walls completely. Remove all artwork, clocks, and window treatments. Next, use the “Center of the Room” strategy. Instead of hauling heavy furniture into the hallway, push everything to the middle of the space. This creates a wide, unobstructed lane around the perimeter of the room. Once the furniture is clustered, cover it with a single large plastic sheet to block falling dust. If the thought of moving your entire living room feels like a workout you didn’t sign up for, you might want to call a professional house painter to handle the heavy lifting.
Furniture and Floor Protection Tactics
What is the best way to protect your floors? Professional painters almost always choose canvas drop cloths over plastic. Plastic is slippery, prone to tearing, and it doesn’t absorb paint spills; it just lets them smear. Canvas stays in place and provides a thick barrier for your hardwood or carpet. For baseboards and built-in shelving, use high-quality painter’s tape to create a crisp line. This “masking” ensures that your interior painting preparation leads to a sharp finish without accidental drips on your woodwork. Remember that Surface Preparation: Cleaning and Repairing Your Walls is much easier when you aren’t worried about ruining your floors.
Hardware and Fixture Removal
Small details often cause the biggest headaches. Have you ever lost the tiny screw that holds an outlet cover in place? Use the “Bag and Tag” method. As you remove switch plates and outlet covers, place them and their specific screws into a sealable plastic bag. Label the bag with a marker so you know exactly where it belongs. We also recommend removing door knobs and locks rather than taping around them. It takes five minutes but results in a much cleaner look around the hardware. For light fixtures, loosen the canopy so you can paint behind the edge, but always ensure the power is off before you start adjusting electrical components.
Surface Preparation: Cleaning and Repairing Your Walls
Now that the room is clear, it’s time to look closely at the walls. What do you see? Most homeowners notice a few nail holes from old pictures, but a professional looks for the invisible barriers. This stage of interior painting preparation is about more than just aesthetics; it’s about making sure your new paint has a stable, clean home. If you paint over a “wall injury” without fixing it first, the new coat will only highlight the flaw rather than hide it.
Living in the Pacific Northwest means we have to respect the air. Vancouver’s humidity levels often fluctuate, and this dampness can significantly impact your project. Why does this matter? Because your walls need to be bone-dry before you apply a single stroke of paint. Trapping moisture behind a fresh coat of paint is a recipe for bubbling and premature peeling. Give your walls extra time to breathe after cleaning, especially if it’s a typical rainy day outside.
The Cleaning Phase: TSP vs. Simple Soap
Is your wall actually clean? Even if it looks fine, it likely carries a thin film of dust or skin oils. For most rooms, a gentle mixture of warm water and mild dish soap is enough to strip away everyday grime. However, kitchens and bathrooms are different stories. Cooking grease and hairspray create a stubborn barrier that soap can’t always touch. In these cases, we recommend Trisodium Phosphate (TSP). It’s a heavy-duty cleaner that cuts through grease and deglosses old paint. Just be careful not to oversaturate the drywall; a damp sponge is better than a soaking wet one.
Patching and Spackling Like a Pro
Filling a nail hole seems simple, but there’s a trick to making it vanish. Use a small putty knife to press spackle into the hole, leaving a tiny mound on top. Why the mound? Spackle shrinks as it dries. Once it’s fully cured, you can sand it flush with the wall. This prevents “flash” marks, which are those annoying shiny spots that appear when the paint absorbs differently into the patch than the rest of the wall.
How do you tell the difference between a simple fix and a bigger problem? Small hairline cracks near door frames are usually just the house settling. But if you see wide, jagged cracks or signs of water damage, it might be time to pause. Proper interior painting preparation means knowing when a surface needs a professional touch before the color goes on. If you’re unsure about the state of your walls, a residential painter can help evaluate the surface and ensure the foundation is solid.
When a project involves significant structural renovation or high-end property updates, companies like Horns Construction emphasize that the quality of the finished space is entirely dependent on the integrity of the underlying work.
The Professional Touch: Sanding and Priming Techniques
Why is sanding the most skipped step in a DIY project? It is dusty, it is tiring, and it feels like you are going backward. But here is the truth: you cannot get a mirror-smooth finish without it. Sanding is a vital part of interior painting preparation because it levels out old brush marks, roller textures, and drips from previous years. It turns a bumpy, lived-in wall into a fresh canvas ready for a new life.
Choosing the right grit is your first step toward success. Start with a 120-grit sandpaper for rough spots or areas where you have applied new spackle. Once the surface is level, switch to a 220-grit paper for a final pass. This finer grit creates a buttery-smooth texture that looks incredible under a fresh coat of eggshell or satin paint. After you finish, perform the “Tack Cloth” test. Run a clean tack cloth over the wall. If you see even a hint of white dust on the cloth, you aren’t ready to paint yet. A 100% dust-free surface is the only way to prevent a gritty texture in your final finish.
Sanding for Smoothness and Adhesion
How do you handle large walls without wearing out your arms? We recommend the pole sanding technique. A sanding pole allows you to reach from the baseboard to the ceiling with steady, even pressure. For trim and detailed woodwork, put the pole away and use hand-sanding blocks. This gives you the control needed for a factory-like finish on your crown molding or window frames. For those who want to achieve that same high-quality appearance on more complex surfaces, you can check out SKR Specialists for professional respray services. To manage the mess, use vacuum attachments on your sander or consider wet-sanding for small, sensitive areas where you want to keep dust to an absolute minimum.
Choosing the Right Primer for Your Project
Is primer really necessary if you are using a “paint and primer in one” product? Often, the answer is yes. Priming is not just about color coverage; it is about problem-solving. Use a stain-blocking primer if you are dealing with old water damage or wood tannins that might bleed through. If you are painting over a glossy old enamel, you need a specialized bonding primer to ensure the new layer doesn’t peel. For those dramatic color shifts, like going from a deep navy to a soft cream, a “high-hide” primer will save you from applying four or five coats of expensive finish paint. Once your primer is dry and your walls are ready, reviewing the 2026 interior painting color trends for Vancouver homeowners can help you make a confident final color choice that suits your space. If you are preparing your home for the market, pairing the right primer with the right finish color is also a key strategy covered in our guide to interior painting for selling a house and maximizing your Vancouver resale value.
Ready to skip the dust and get straight to the flawless results? Connect with a professional painting contractor to handle the heavy lifting and technical details for you.
For those in other regions looking for specialized residential support, you can explore HDB painting services to see how professional teams handle the unique requirements of high-density urban housing.
Similarly, for homeowners in Ontario seeking expert renovation support, HMJ Contracting provides professional craftsmanship that ensures every project starts with a perfect foundation.
Homeowners in the New Jersey area can also discover Hudson Line Painters for expert guidance on exterior maintenance and deck staining.
When to DIY Prep vs. Hiring Vancouver’s Professional Painters
Is your time better spent on a ladder or with your family? That is the big question every homeowner faces. Deciding between a DIY approach and hiring a professional interior painting preparation team usually comes down to your “Prep-to-Paint” ratio. If you only have a single weekend, you might only finish the cleaning and taping. Industry data shows that surface preparation makes up roughly 70% of the work in a professional project. Do you have the hours required to do it right?
Think about the “Ladder Factor.” High ceilings and vaulted entryways in many Vancouver homes make prep work physically demanding and potentially dangerous. A professional house painter arrives with the right scaffolding and safety gear to handle these heights with ease. There is also the equipment to consider. While a DIYer might use a hand block, a professional painting contractor uses HEPA-filtered sanders. These tools capture dust at the source, keeping your air clean and your furniture free of that fine white film that typically follows a sanding job. Before committing to a full DIY approach, it’s worth reading our 2026 buyer’s guide to evaluating residential interior painting services so you know exactly what to look for when comparing your options.
The Brush Hour Difference in Preparation
We don’t just start painting. Our team performs a meticulous multi-point inspection of every wall surface before the first drop of paint is even mixed. We look for the subtle imperfections that the untrained eye might miss. We treat your Vancouver home like it is our own, ensuring that every baseboard is masked and every floor is protected with heavy-duty canvas. Once we have built that perfect foundation, we transition from prep to The Ultimate Guide to Interior House Painting to deliver a finish that looks like a work of art.
Get Your Fresh Start in Vancouver and Battle Ground
Why does local expertise matter? The PNW climate brings specific challenges, from fluctuating humidity to light levels that change how colors appear on a wall. We understand the local environment because we live here too. We take the stress out of the process so you can focus on the excitement of your home’s transformation. You don’t have to spend your evenings scrubbing walls or taped to a roll of blue paper. A beautiful, revitalized home starts with a simple phone call. Let a professional residential painter handle the heavy lifting while you enjoy the results.
Start Your Flawless Home Transformation Today
You now have the roadmap for professional results. Remember that thorough interior painting preparation is the absolute foundation of every beautiful room. From organizing your space to the final pass of a tack cloth, every detail ensures your new color looks vibrant and stays bonded for years to come. When you treat your walls like a foundation rather than just a surface, the results speak for themselves.
Does the project still feel like a heavy lift? You don’t have to tackle it alone. We have been serving homeowners in Vancouver and Battle Ground since 2012 with a focus on clean, organized, and reliable service. As a licensed and insured painting contractor in WA, we utilize HEPA-filtered dust containment to protect your air and your belongings. We handle the technical repairs and the high-ladder work so you can focus on the excitement of your home’s new look.
Ready for a stress-free transformation? Get your free painting estimate today!
Your home is your sanctuary; let’s work together to make it feel fresh and revitalized again.
Frequently Asked Questions
Do I really need to wash my walls before painting?
Yes, washing your walls is a non-negotiable step for a long-lasting finish. Dust and skin oils act as a barrier that prevents paint from bonding to the surface. For most rooms, a simple mix of warm water and dish soap works perfectly. If you are prepping a kitchen, use a degreaser like TSP to cut through cooking film. Just make sure the walls are completely dry before you move to the next phase of your interior painting preparation.
What is the best way to fill large holes in drywall?
Large holes require a mesh patch or a piece of replacement drywall rather than just spackle. Spackle is prone to shrinking and cracking in gaps larger than a nail hole. Apply a self-adhesive mesh patch over the hole, then cover it with two or three thin layers of joint compound. Sand between each layer until the patch is flush with the wall. This creates a solid, invisible repair that won’t fail over time.
How long should I wait for primer to dry before painting?
You should typically wait between one and four hours for primer to dry, but local conditions matter. In the damp Vancouver climate, primer can take longer to fully cure. Always check the manufacturer’s label for specific instructions. If the surface feels tacky or cool to the touch, it isn’t ready. Applying paint over wet primer can lead to bubbling or a finish that never quite hardens properly.
Can I paint over wallpaper if I prep it correctly?
You can paint over wallpaper, but it requires a very specific approach to avoid peeling. Never use water-based primer first, as it can soak into the paper and loosen the adhesive. Instead, apply a high-quality oil-based primer to seal the wallpaper and prevent the pattern from bleeding through. If the wallpaper is peeling or textured, removing it entirely is always the safest path for a professional look.
Is it better to use tape or “cut in” by hand?
Most professionals prefer to “cut in” by hand, but tape is a fantastic tool for homeowners. If you don’t have years of experience with a brush, high-quality painter’s tape provides a necessary safety net for your baseboards and ceilings. It allows you to work faster without the fear of a shaky hand ruining your trim. Just remember to remove the tape while the paint is still slightly damp for the cleanest lines.
How do I get rid of the dust after sanding walls?
The most effective way to remove sanding dust is a two-step process. First, use a vacuum with a brush attachment to pick up the heavy debris from the walls and baseboards. Follow this with a damp microfiber cloth or a specialized tack cloth to grab the microscopic particles. If you leave even a small amount of dust behind, your final coat will have a gritty, sandpaper-like texture that is impossible to hide.
To ensure your home remains perfectly clean once the dust from your project settles, you can learn more about Smart Cleaning Service House Cleaning Seattle and Eastside for professional post-renovation cleaning services.
Should I remove my light switch covers or just tape them?
You should always remove your light switch and outlet covers instead of taping them. It only takes a few minutes with a screwdriver, and it results in a much cleaner finish. Taping around covers often leaves a visible ridge of paint or accidental smears on the plastic. Use the “Bag and Tag” method we mentioned earlier to keep your screws organized so you don’t lose them during the project.
What kind of tape is best for interior painting preparation?
High-quality blue or green painter’s tape is the best choice for interior painting preparation. Avoid using standard tan masking tape, as the adhesive is too strong and can damage your wall or leave a sticky residue behind. Look for tape specifically labeled for the surface you are protecting, such as “delicate surface” tape for freshly painted trim or “multi-surface” for standard walls and hardwood floors. If you want to feel fully confident in your hiring decision before your project begins, our guide to evaluating residential interior painting services walks you through every question you should ask a contractor.