
What if the secret to a high-end home finish isn’t the color you choose, but exactly when the brushes touch the wall? You’ve likely seen it happen; a beautiful paint job ruined by a floor installer’s scuff or a plumber’s smudge. It’s frustrating to watch builder-grade paint chip or fade before you’ve even moved in. Getting the interior painting for new construction right requires more than just a steady hand; it’s about mastering the “trade dance” between every contractor on site.
Are you worried about drywall imperfections showing through or picking a sheen that won’t hold up to daily life? We understand the pressure of making these decisions while a build is in motion. This guide will show you how to navigate drywall finish levels, choose durable materials that outlast standard contractor packs, and sync your schedule for a flawless result. We’ll walk through the ideal timeline for your project, the best sheens for every room, and how to ensure your new build feels like a masterpiece from day one. You’ll learn exactly how to coordinate with other trades so your investment stays protected until the keys are in your hand.
Key Takeaways
- Master the unique sequence of interior painting for new construction to avoid trade damage and ensure a durable, high-end finish.
- Learn why the “Raw Surface Challenge” requires specialized priming techniques to stop new drywall from soaking up your topcoat.
- Discover how to evaluate drywall finish levels so you can achieve the “Gold Standard” Level 5 look in your main living spaces.
- Navigate Pacific Northwest humidity and “New House Sweat” with expert strategies for proper paint adhesion in damp climates.
- Get the step-by-step timeline for scheduling painters after the drywall is hung but before your hardwood floors are installed.
Why Interior Painting for New Construction Requires a Specialized Approach
Why does interior painting for new construction feel so much more complex than a standard weekend project? It’s because you aren’t just changing a color; you’re finishing a structural surface. In a new build, your walls are a blank canvas of raw drywall, joint compound, and dust. This isn’t a simple one-day job. It’s a strategic, multi-stage process that requires a deep understanding of how “virgin” materials react to moisture and pigment. If you treat a new build like a simple repaint, you’ll likely see the results fail much sooner than expected.
Did you know that the painter is often the final quality control expert on a job site? Since paint is the last layer, it’s the professional painter who spots the tiny drywall cracks, missed sanding spots, or trim gaps before they become permanent eyesores. Many homeowners are surprised to find that builder-grade “one-coat” systems often begin to flake or show wear within just two years. Why? Because those systems prioritize speed over durability. A specialized approach ensures your home doesn’t just look good for the open house; it stays beautiful for the long haul.
Raw Drywall vs. Residential Repaints
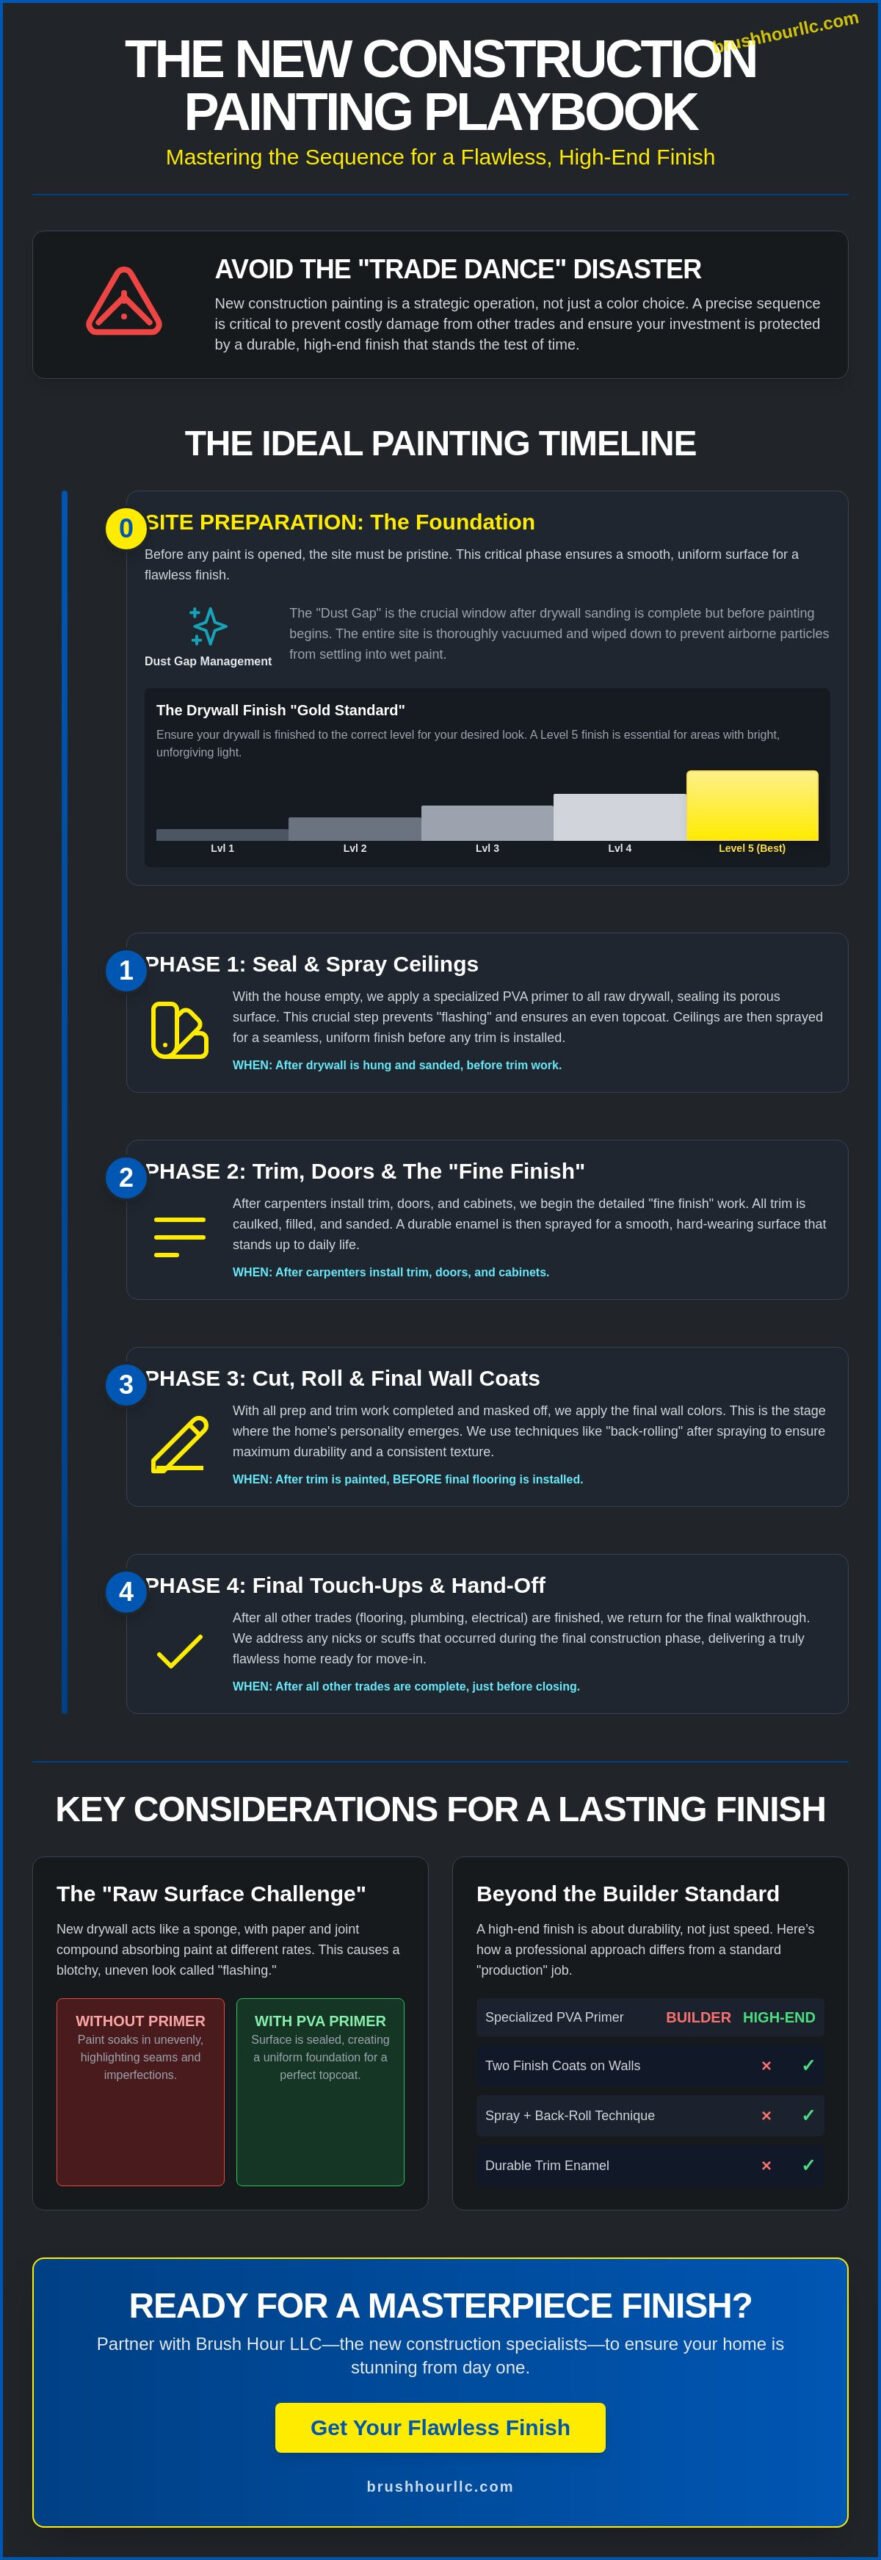
Have you ever noticed how a sponge drinks up water? That’s exactly how new drywall behaves. The paper and the joint compound have different absorption rates, which can lead to a blotchy, uneven appearance called “flashing.” This is the “Raw Surface Challenge.” While standard paint-and-primer-in-one products work wonders on previously painted walls, they often fall short on raw gypsum. You need a specialized PVA (Polyvinyl Acetate) primer to seal those pores effectively. By mastering these painting techniques and materials, professionals create a uniform foundation that allows the final color to sit perfectly on the surface rather than being sucked into the wall.
The High-End Finish: Beyond the Builder Standard
What separates a custom home finish from a “production” job? It’s the difference between rushing and refining. In the world of interior painting for new construction, modern lighting is often bright and unforgiving. Large, open walls will show every minor imperfection if the paint isn’t applied with precision. We move beyond the builder standard by utilizing techniques like back-rolling. This involves following a spray application with a manual roller to work the paint into the surface. It creates a slight, uniform texture that hides imperfections and makes future touch-ups much easier. Is it extra work? Yes. But it’s the only way to achieve a durable, high-end finish that stands up to the scrutiny of a brand-new home.
The Professional Painting Sequence: When to Schedule Your Painters
Coordination is the heartbeat of a successful build. In the world of interior painting for new construction, timing isn’t just a logistical detail; it’s the foundation of a high-end finish. If the painters arrive too early, they’re fighting dust from the carpenters. If they arrive too late, they’re stepping over expensive hardwood floors. The goal is a seamless “trade dance” where every contractor works in harmony. Most homeowners wonder when the ideal window opens. The answer is usually right after the drywall is sanded but before the final flooring and delicate fixtures are installed.
Managing the “Dust Gap” is vital for success. Before any finish coats are applied, the site must be vacuumed and wiped down. This ensures that floating particles don’t settle into your wet paint. During this stage, we also monitor the environment. Proper Moisture Control in New Construction is essential as the building materials settle and the HVAC system begins to regulate the indoor air. Ensuring the home is dry and stable prevents future peeling or adhesion issues. If you’re feeling overwhelmed by the schedule, a local painting contractor can help you map out these critical milestones.
Phase 1: The First Prime and Ceiling Spray
We start by priming the walls before the baseboards or window casings are even on the site. This seals the raw drywall and creates a uniform surface. It’s much more efficient to spray the ceilings while the house is still an empty shell. During this phase, we take extra care to protect window vinyl and any installed tubs or showers from overspray. This early start ensures that the “bones” of your interior finish are solid before the decorative details arrive.
Phase 2: Trim, Doors, and the “Fine Finish”
Once the trim carpenters finish their work, we focus on the details. Whether you’ve chosen pre-primed or raw wood trim, we prep every joint and nail hole for a furniture-grade look. We often set up a controlled “shop” environment on-site to spray doors, ensuring a smooth, factory-like finish without brush marks. Crucially, we aim to complete the first wall coat before the final flooring installation. This protects your new hardwoods or carpets from the bulk of the painting activity.
Phase 3: The Final Finish and Trade Touch-Ups
We often follow the “Last Man In” rule for the final coat. This happens after the light fixtures are hung and the plumbing is finished. Why wait? Because other trades inevitably leave small scuffs or marks while installing appliances and cabinets. We perform a final walkthrough under varied lighting conditions to ensure every corner is perfect. We also handle the small scuffs that occur during the moving process, leaving you with a home that truly feels brand new.
Evaluating Quality: Drywall Finish Levels and Material Selection
Have you ever walked into a brand-new home and noticed “ghostly” seams where the drywall sheets meet? It’s a common frustration for homeowners. While the paint color might be perfect, the surface underneath determines the final quality of the job. In the world of interior painting for new construction, the quality of the finish is directly tied to the drywall level. Most builders provide a Level 4 finish as a standard, but for a truly flawless look, you need to understand what happens before the first drop of paint is applied.
Professional results aren’t just about luck; they’re about adhering to nationally recognized industry standards. These guidelines define what a “properly painted surface” actually looks like. One of the biggest hurdles in new builds is “flashing.” This occurs when different absorption rates between drywall mud and paper cause the paint to look shiny in some spots and dull in others. A skilled painting contractor uses high-build primers and specific application techniques to ensure a uniform sheen across every wall, regardless of the lighting.
Understanding Level 5 Drywall Finishes
What exactly is a Level 5 finish? Think of it as the gold standard for high-end residential builds. It involves applying a thin skim coat of joint compound over the entire wall surface, not just the seams and fasteners. In modern homes with large windows and abundant natural light, this step is essential. It eliminates the texture difference between the paper and the mud. Without it, the “critical lighting” from those beautiful windows will reveal every joint. If you want a perfectly smooth, gallery-like look, Level 5 is the only choice that truly delivers.
Choosing the Right Paint for New Surfaces
Which paint should you choose for your new surfaces? Many homeowners are moving toward matte finishes because they hide minor wall imperfections beautifully. However, matte paint used to be difficult to clean. Today, we recommend advanced products like “Scuff-X” for high-traffic hallways and mudrooms. These coatings offer the sophisticated look of a low sheen with the durability of a commercial-grade finish. It’s also important to consider VOC (Volatile Organic Compound) levels. Using low- or zero-VOC paints ensures your new home smells fresh and is safe for move-in day.
Choosing the right sheen is a balancing act. While flat paint hides drywall flaws, it doesn’t stand up well to scrubbing. On the other hand, high-gloss sheens are durable but highlight every tiny bump on the wall. We typically suggest an eggshell or satin finish for kitchens and bathrooms where moisture resistance is key. For living areas, a high-quality matte finish provides a modern, velvety appearance that still allows for light cleaning. If you want to explore how professional wall painting techniques and 2026 color trends can elevate every room in your new home, it’s worth reviewing the latest guidance on sheen selection and expert application methods. Once your base colors are locked in, many homeowners also explore interior accent wall painting to add depth and personality to key rooms without overwhelming the space. By selecting the right materials early, you ensure your home stays looking “just painted” for years to come.
Pacific Northwest Challenges: Moisture and New Build Logistics
Have you ever heard of “New House Sweat”? It sounds strange, but it’s a critical factor for anyone managing interior painting for new construction in the Pacific Northwest. When a home is first framed, the lumber often holds a high moisture content. As the house is sealed and the heat is turned on, that moisture has to go somewhere. It evaporates out of the wood and through the drywall. If your paint is applied too quickly or in the wrong conditions, this escaping moisture can cause bubbles or peeling before you even move in.
Why is temperature consistency so important? For at least 48 hours after the paint is applied, the environment needs to stay stable. In places like Vancouver and Battle Ground, our high humidity can lead to a phenomenon called “surfactant leaching.” This happens when the paint dries too slowly, causing the ingredients that keep the paint mixed to rise to the surface as sticky, brownish spots. It’s not a product failure; it’s an environmental one. Maintaining a steady temperature and controlling humidity is the only way to ensure the paint cures exactly as the manufacturer intended. This is why our process involves more than just opening a can; it involves managing the air around the walls.
Vancouver WA Climate Considerations
How do we handle the relentless PNW dampness? We don’t just hope for a dry day. Our interior house painters actively monitor the moisture levels in the air and the surfaces themselves before the first brush stroke. During the rainy season, we often rely on industrial dehumidifiers and temporary heating units to stabilize the interior. This is especially important for wood trim. If the trim is too damp when painted, it will shrink significantly as it dries, leading to unsightly gaps in the caulking and joints. We make sure the environment is right before we start, protecting your investment from the local weather. Partnering with trusted residential painting professionals who understand Vancouver’s unique climate challenges is one of the most important decisions you can make for your new home’s long-term finish.
Working with Local Builders and Contractors
Coordination is key when working on a busy job site. We work closely with local Vancouver-based general contractors to ensure our phase of the project doesn’t clash with other trades. Are you building in a more rural area like Battle Ground? Site logistics can get complicated with mud and limited access. We prioritize site safety and professional organization, ensuring we are fully licensed and insured for your peace of mind. By syncing our schedule with your builder, we provide a smooth handoff that keeps your project moving forward without delays. If you’re ready to protect your new investment, contact a professional painting contractor to discuss your project’s specific needs.
Partnering with Brush Hour LLC for Your New Home
Are you ready to see your vision come to life? Choosing the right team for interior painting for new construction is about more than just finding someone with a ladder. It’s about finding a partner who values your investment as much as you do. At Brush Hour LLC, we bring a level of high-precision craftsmanship that turns a standard build into a custom masterpiece. We don’t just paint walls; we create the backdrop for your future memories. We understand that after months of construction, you want a finish that feels fresh, clean, and perfect.
Why do our residential results look so much sharper than the average contractor? It’s because our background in commercial painting service projects has taught us the value of efficiency and durability. In the commercial world, finishes must withstand heavy traffic and intense scrutiny. We apply those same high-standard techniques to your living room, ensuring a finish that is both beautiful and resilient. From detailed prep to the final walkthrough, we stay focused on the details that others might miss. We take pride in being the “helpful local experts” who guide you through the final stages of your build.
Our New Construction Process
Precision starts long before the paint can is opened. Our “zero-dust” preparation and masking standards mean we protect every surface that isn’t meant to be painted. We use advanced vacuum-assisted sanding and meticulous taping to keep your new home pristine. We also believe in long-term relationships, which is why we offer a “Touch-up for Life” philosophy. If life happens and you get a small scuff months after moving in, we’re here to help. To ensure your home is move-in ready, we exclusively use premium, low-odor, and low-VOC paints that protect your indoor air quality.
Ready to Transform Your New Build?
When is the best time to start the conversation? We recommend reaching out during your framing or drywall phase. This early coordination allows us to sync perfectly with your general contractor and secure a spot in our build schedule. New construction timelines move fast, and early booking ensures your home stays on track for a flawless finish. Don’t leave the most visible part of your home to chance. Let’s work together to make your new house feel like home from the moment you step inside.
Get a detailed quote for your new construction painting project and take the first step toward a flawless finish.
Secure the Flawless Finish Your New Home Deserves
You’ve put months of planning and hard work into building your dream home. Why settle for a rushed, builder-grade paint job that won’t stand the test of time? We’ve explored how the right scheduling “dance,” Level 5 drywall standards, and moisture-aware techniques make all the difference in a high-end result. Mastering interior painting for new construction is about more than choosing the perfect palette. It’s about ensuring every surface is sealed, prepped, and finished to survive the specific humidity of the Pacific Northwest.
As a licensed and insured team in Washington, we’ve earned a 5-star local reputation in Vancouver and Battle Ground for our precision and reliability. We understand the local climate challenges and know how to coordinate with your other trades for a stress-free experience. Are you ready to see your vision come to life? Get Your Professional New Construction Painting Estimate today. Let’s turn your new build into the masterpiece you’ve always imagined. We’re here to help you cross the finish line with confidence and style.
Frequently Asked Questions
Should I paint my new construction home before or after the flooring is installed?
You should schedule your main painting phase after the drywall is finished but before your final hardwood or carpet is installed. This sequence allows painters to work efficiently without the risk of dripping paint on expensive new flooring. Once the floors are in and other trades finish their work, your painting contractor can return for a final coat and minor touch-ups to ensure everything is perfect.
What is the difference between builder-grade paint and professional-grade paint?
Builder-grade paint is designed for high-speed application and low cost, while professional-grade coatings offer superior durability and pigment density. Builder-grade options often have a high clay content, which makes them look flat but very difficult to clean without scuffing. Professional-grade paints use higher quality resins that resist fading and allow you to wipe away smudges without damaging the finish.
How long does it take to paint the interior of a new 2,500 sq. ft. home?
A standard 2,500 square foot new build usually takes between seven and ten working days to complete from the initial prime to the final finish. This timeline accounts for the specialized steps required in interior painting for new construction, including extensive masking, multiple coats on raw surfaces, and necessary drying times between phases. A larger crew might move faster, but quality drying time is essential for a lasting bond.
Is it better to spray or roll the walls in a new construction project?
The most effective method for a new build is a spray application followed immediately by back-rolling. Spraying provides excellent coverage on large, empty surfaces, while back-rolling works the paint into the drywall pores for better adhesion. This combination creates a slight texture that makes future touch-ups much easier to hide compared to a perfectly smooth, spray-only finish.
What is a Level 5 drywall finish, and do I really need it for my home?
A Level 5 finish is a thin skim coat of joint compound applied over the entire wall to create a perfectly uniform surface. You don’t always need it for every room, but it’s highly recommended for areas with “critical lighting,” such as rooms with large windows or vaulted ceilings. This extra step prevents the difference in texture between the drywall paper and the mud from showing through your paint.
How do I handle paint touch-ups after the movers have finished?
Keep a small amount of the original paint and a high-quality brush or mini-roller for minor scuffs. It’s best to use the same application tool that was used for the final coat to ensure the texture matches. If the damage is extensive, it’s often better to paint the entire wall from corner to corner to avoid “flashing,” where the touched-up spot looks different than the surrounding area.
Can I paint my new home myself to save money on the build?
While DIY is an option, interior painting for new construction is significantly more technical than a simple room repaint. Raw drywall is incredibly thirsty and requires specific high-build primers to seal properly. If you miss a step or use the wrong materials, you might end up with peeling paint or visible seams that are very expensive to fix later. Hiring a professional ensures the foundation of your home’s aesthetic is solid.
What should I look for in a painting contract for a new construction home?
Your contract should specifically list the levels of drywall preparation, the exact brand of primer and paint, and a defined sequence of work. Make sure it includes details about how many coats will be applied and how the painters will protect other surfaces like windows and cabinets. A clear contract from a reputable painting contractor protects your investment and ensures everyone is on the same page regarding the final quality standards.