
Painting over peeling spots without fixing the real problem is one of the most common and costly mistakes homeowners make. If you’ve tried that before and watched the fresh paint bubble and flake within a season, you already know the frustration. Here in the Pacific Northwest, moisture doesn’t just speed up the damage; it’s usually the root cause of it. Learning how to fix peeling exterior paint the right way means understanding one simple truth: this job is about 90% moisture management and 10% application. Skip the prep, and any repair is temporary.
You’re not alone if you’re staring at your siding right now wondering whether you can spot-treat the worst areas or whether you’re looking at a whole-house project. That’s exactly the question this guide is built to answer. We’ll walk you through the professional step-by-step process that addresses the underlying causes of peeling, not just the surface symptoms, so your results actually last through the rain, the gray winters, and everything else the PNW throws at your home.
From diagnosing why your paint is failing to choosing the right materials and timing your project around the weather, here’s everything you need to get a smooth, long-lasting finish and real protection for your home.
Key Takeaways
- Peeling exterior paint is almost always a moisture problem first — learning how to fix peeling exterior paint the right way means addressing the root cause before touching a brush.
- Proper surface prep, including scraping to a sound edge and feathering with an orbital sander, is what separates a lasting repair from one that fails by next winter.
- The Pacific Northwest’s wet climate creates narrow painting windows, so knowing when and how to time your project is just as important as the materials you choose.
- Whether this is a DIY spot repair or a full exterior repaint depends on scale, height, and safety — and this guide helps you make that call with confidence.
- A simple bi-annual inspection routine and clean gutters can prevent most peeling from ever coming back, saving you serious time and money down the road.
Why Is My Exterior Paint Peeling? Identifying the Root Cause
Paint doesn’t just decide to fail on its own. Peeling is a loss of adhesion, the bond between your paint film and the surface beneath it breaking down until the coating literally lifts away. That’s the simple definition, and it’s the right place to start because once you understand what’s breaking that bond, the fix becomes a lot clearer.
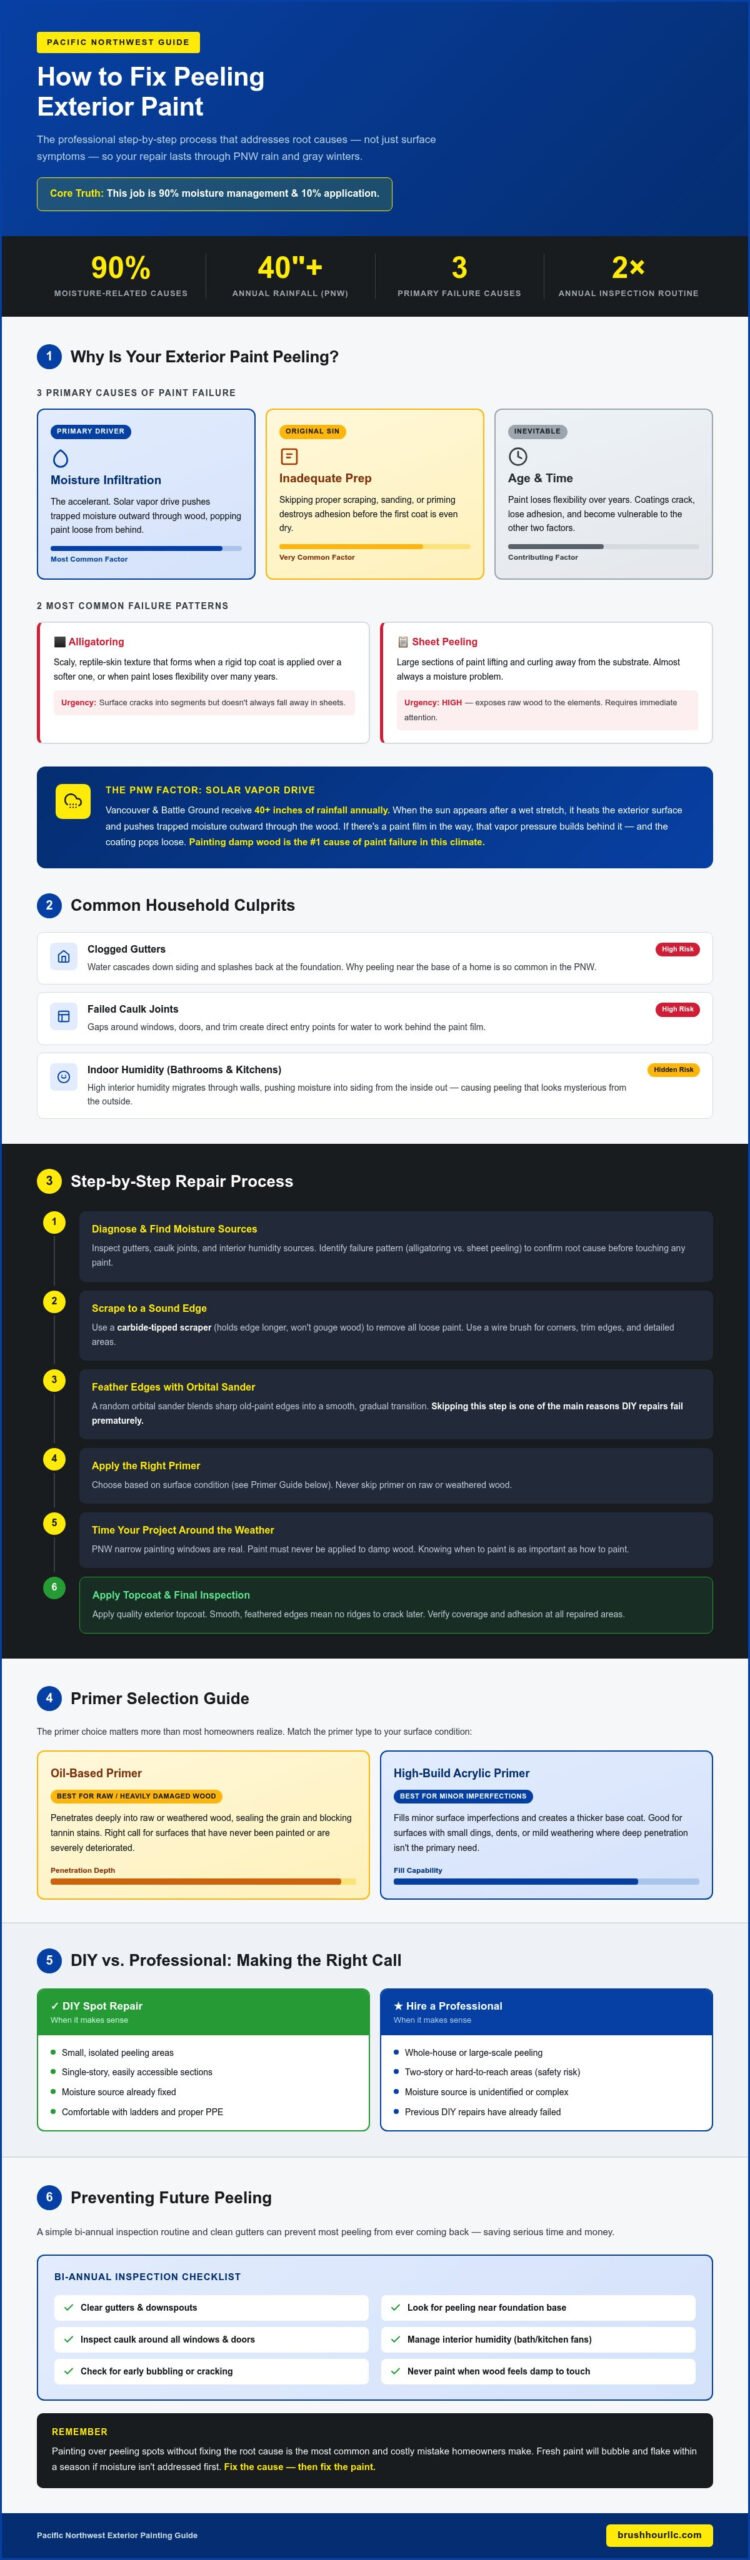
The three primary causes of exterior paint failure are moisture infiltration, inadequate surface preparation, and age. Most of the time, you’re dealing with all three at once. Moisture is the accelerant. Poor prep is the original sin. Age is just time doing what time does. Understanding which one is driving your specific situation is the first real step in learning how to fix peeling exterior paint that actually stays fixed.
Two failure patterns show up most often on homes in this region:
- Alligatoring: A scaly, reptile-skin texture that forms when a rigid top coat is applied over a softer one, or when paint loses flexibility over many years. The surface cracks into interlocking segments but doesn’t always fall away in sheets.
- Sheet peeling: Large sections of paint lifting and curling away from the substrate. This is almost always a moisture problem, and it tends to be more urgent because it exposes raw wood to the elements.
The PNW Factor: How Vancouver Moisture Affects Your Siding
Vancouver and Battle Ground receive over 40 inches of rainfall annually, and that number doesn’t capture the full picture. It’s the persistent dampness, the gray weeks without a real dry day, that does the most damage. Wood siding absorbs moisture from rain and ground splash, but it also pulls moisture from inside your home outward through a process called solar vapor drive. When the sun finally appears after a wet stretch, it heats the exterior surface and pushes trapped moisture outward through the wood. If there’s a paint film in the way, that vapor pressure builds up behind it and the coating pops loose. Painting damp wood locks that moisture in place and is the single most common cause of paint failure in this climate.
Common Household Culprits: From Gutters to Caulking
Sometimes the source of peeling isn’t the weather at all. It’s a clogged gutter sending water cascading down the siding and splashing back at the foundation, which is why peeling near the base of a home is so common here. Failed caulk joints around windows, doors, and trim create direct entry points for water to work behind the paint film. And don’t overlook your own interior. High humidity from bathrooms and kitchens migrates through walls and can push moisture into the siding from the inside out, causing peeling that looks mysterious from the outside but makes complete sense once you know how to fix peeling exterior paint at its actual source.
Gathering the Right Supplies for a Professional-Grade Fix
Getting your tools and materials right before you start isn’t just good practice. It’s the difference between a repair that holds for a decade and one that’s peeling again by spring. Knowing how to fix peeling exterior paint is only half the equation; having the right supplies to execute it properly is the other half.
Start with your scraping tools. A carbide-tipped scraper is worth the investment over a standard steel blade because it holds its edge far longer and cuts cleanly through thick, built-up paint layers without gouging the wood underneath. For corners, trim edges, and detailed areas, a wire brush helps you clear loose material from spots a flat scraper can’t reach. Don’t skip either one.
Once the loose paint is gone, you’ll need to feather the edges where old paint meets bare wood. This is where a random orbital sander earns its place in the project. A quality orbital sander blends those sharp edges into a smooth, gradual transition so your topcoat doesn’t bridge over a ridge and crack later. It’s one of the steps most DIY guides skip, and it’s one of the main reasons repairs fail prematurely.
For primer, the choice matters more than most homeowners realize:
- Oil-based primers penetrate deeply into raw or weathered wood, sealing the grain and blocking tannin stains. They’re the right call for heavily damaged or previously unpainted wood surfaces.
- High-build acrylic primers fill minor surface imperfections and create a thicker base coat that gives your topcoat something substantial to bond to. These work well for spot repairs on surfaces that are otherwise sound.
Round out your supply list with a paintable exterior caulk rated for outdoor use. Every gap around windows, door frames, and trim is a direct entry point for water. Seal them before you prime, not after, so the caulk gets locked in under your coating system rather than sitting exposed on top of it.
Safety First: Dealing with Lead-Based Paint
If your home was built before 1978, stop before you scrape a single chip. Lead-based paint was common in residential construction until it was banned for home use, and disturbing it without protection creates a real health hazard. Wear an N100 respirator, not a standard dust mask, along with nitrile gloves and safety glasses. Use the wet scraping technique: mist the surface lightly with water before scraping to keep paint particles from becoming airborne. Dispose of debris in sealed plastic bags. When in doubt, use an EPA-approved lead test kit before you begin.
Choosing the Right Exterior Paint for the Pacific Northwest
In this climate, 100% acrylic latex paint is the clear choice. It stays flexible through the temperature swings between a cold January morning and a July afternoon, which means it expands and contracts with the wood instead of cracking. Look specifically for formulas described as “breathable” or vapor-permeable. These allow moisture that does get into your siding to escape rather than building pressure behind the film. For a deeper look at how professional coatings protect PNW homes long-term, the team at exterior house painters breaks it down in detail. If you’d rather have a local expert handle the product selection and application, Brush Hour LLC brings that regional knowledge to every project.
The Step-by-Step Process: How to Fix Peeling Exterior Paint
Now that you understand why paint fails and what materials you need, it’s time to actually do the work. Follow these steps in order. Skipping ahead is how repairs fail. Each step builds on the last, and the sequence matters as much as the execution.
Step 1: Clean the surface first. Before a scraper touches your siding, wash the entire area with a low-pressure rinse. You’re removing dirt, mildew, and chalky residue that would prevent anything from bonding properly. A standard garden hose with a spray nozzle works for most jobs. Keep the pressure low and aim downward so you’re not forcing water up behind the siding. Let the surface dry completely before moving on, which in the Pacific Northwest can mean waiting a full day or two.
Step 2: Scrape to a sound edge. Work your carbide scraper firmly across all peeling areas. You’re not trying to strip everything down to bare wood. You’re looking for the point where the paint stops lifting and stays firmly attached. That’s your sound edge. If the paint around a spot feels soft or spongy when you press it, keep scraping. Stopping short of a true sound edge is the single most common reason repairs fail within a season.
Step 3: Feather-sand the edges. This is the step most guides skip entirely, and it’s the one that separates a professional result from a patchy, visible repair.
Step 4: Prime the bare wood. Apply your chosen primer to every area of exposed substrate before any topcoat goes on. Don’t rush this step or treat it as optional.
Step 5: Apply two coats of finish paint. Work during a dry weather window with temperatures between 50 and 85 degrees Fahrenheit. Allow the first coat to cure fully before applying the second.
The Art of Feather Sanding for a Smooth Finish
Once you’ve scraped to a sound edge, you’re left with a hard ridge where old paint meets bare wood. Paint that bridges over that ridge will crack along the same line within a year. Feather sanding blends that transition gradually so it disappears under the new coating. Use 80-grit to 100-grit sandpaper on your orbital sander and work outward from the bare area in smooth, overlapping passes. The goal is a slope, not a cliff. Run your fingertips across the edge when you’re done. If you can feel where the old paint ends, keep sanding. When the transition is invisible to the touch, you’re ready to prime.
Priming and Caulking: The Secret to Longevity
Spot priming isn’t just covering bare wood. It’s creating a sealed, uniform base so your topcoat bonds evenly across both old paint and raw substrate. Without it, you’ll see flashing, uneven sheen, and premature adhesion failure in the repaired zones.
Caulk every joint before you prime, not after. Target these specific locations:
- Butt joints where two siding boards meet end-to-end
- The perimeter of window and door frames where trim meets siding
- Any gap where dissimilar materials meet, such as wood siding against a brick chimney
One critical warning: never caulk the bottom edge of lap siding or any designed weep holes. Those gaps exist to let moisture escape. Seal them and you trap water inside the wall, which is exactly the moisture problem that causes peeling in the first place. Knowing how to fix peeling exterior paint correctly means knowing what not to seal just as much as what to seal.
DIY vs. Professional Painting: Making the Right Choice for Your Home
Here’s the honest question most guides won’t ask you directly: is this actually a DIY job for you, specifically? Not for a hypothetical homeowner with a single-story ranch and a free weekend. For you, your house, and the actual extent of what you’re looking at right now.
Start with scale. A few peeling spots on a ground-floor section of siding? That’s a manageable afternoon project if you follow the prep steps properly. But if you’re looking at widespread failure across an entire south-facing or west-facing wall, you’re not talking about spot repairs anymore. You’re talking about a full wall strip, prime, and repaint, which is a fundamentally different project in terms of time, materials, and physical demand.
Then there’s height. Working off an extension ladder on a two-story home is not the same as stepping up two rungs on a stepladder. Falls from ladders are among the most common causes of serious home improvement injuries. If you don’t own the right ladder, proper standoffs to keep it away from the siding, and fall protection for elevated work, factor that equipment cost in before you decide DIY is the cheaper path.
Speaking of cost: the true price of a DIY exterior paint repair includes a carbide scraper, an orbital sander, primer, finish paint, caulk, brushes, rollers, and drop cloths. Add the time honestly. A thorough spot repair on a single wall often runs 20 to 40 hours once prep, drying time, and two finish coats are accounted for. That’s real time with a real value, and it doesn’t include any do-overs if something goes wrong.
When the Damage Is More Than Skin Deep
Some situations go beyond what knowing how to fix peeling exterior paint can solve. Press your fingertip firmly against the wood in the worst peeling areas. If it feels soft, spongy, or gives at all, you’re dealing with wood rot, not just a paint problem. Widespread dry rot, deep moisture intrusion, or failure across multiple elevations are signs that the siding itself needs professional evaluation before any coating work begins. A qualified painting contractor doesn’t just look at the paint; they assess the health of the substrate underneath it. Many professionals use moisture meters to measure the actual moisture content of the wood before they commit to a coating system. That single step prevents the most common and expensive mistake in exterior painting: sealing moisture inside a wall that hasn’t fully dried.
The Value of a Professional Warranty in Vancouver
A well-executed professional exterior paint job in this climate is typically expected to last significantly longer than a DIY repair, largely because of spray application, commercial-grade materials, and the kind of thorough prep that’s hard to replicate without professional equipment. A DIY repair done correctly can hold up well, but an incomplete prep job or a single missed moisture issue can mean you’re back on the ladder within a couple of seasons.
Brush Hour LLC brings licensed and insured expertise specifically calibrated to Vancouver and Battle Ground conditions, including the local knowledge of weather windows, substrate behavior in wet climates, and coating systems built for PNW homes. If you want a result that holds, not just looks good on day one, that regional experience matters more than most homeowners realize. Find out what that looks like for your home by exploring residential painting near me options built around your specific neighborhood and climate.
Not every project needs a professional. But every homeowner deserves an honest framework for making that call. Get in touch with Brush Hour LLC to talk through what your home actually needs before you commit either way.
Preventing Future Peeling: Long-Term Protection for PNW Homes
Knowing how to fix peeling exterior paint is genuinely useful. Knowing how to prevent it from coming back is what saves you from repeating the whole process in two years. The good news is that a consistent, low-effort maintenance routine does most of the heavy lifting here. You don’t need to repaint every season. You just need to stay ahead of the small problems before they become large ones.
Start with a bi-annual inspection. Walk your home’s exterior in early spring and again in late fall, right before the wet season settles in. Look for hairline cracks in the paint film, soft spots in the wood, and any areas where caulk has shrunk or separated. Catching these early means a quick touch-up with a brush and a tube of caulk rather than a full scrape-and-reprime job. Small chips and cracks are entry points. Moisture doesn’t need a large opening to get behind a paint film and start lifting it.
Keep your gutters clean. It sounds basic, but overflowing gutters are one of the leading causes of peeling along the upper courses of siding and near the roofline. Water that spills over the edge runs directly down the wall, saturating the same areas repeatedly. A clean gutter directs that water away from your siding entirely.
Maintain a six-inch gap between soil or mulch and the bottom of your siding. Ground-level moisture wicks upward into wood faster than most homeowners expect, and mulch beds pushed tight against the foundation hold that moisture in place around the clock.
Managing Vegetation and Airflow
Trim shrubs and plantings at least 12 to 18 inches away from the house. This isn’t just about preventing physical abrasion from branches rubbing the paint. It’s about airflow. After a typical Vancouver rainstorm, siding needs to breathe and dry out. Dense vegetation traps humidity against the surface for hours longer than it should, giving moisture more time to work into the wood. Avoid using a pressure washer on high settings for routine cleaning. High-pressure water drives directly into the wood grain and defeats the entire purpose of your coating system. A low-pressure rinse with a garden hose, aimed downward, is all you need.
Partnering with a Local Expert for Exterior Maintenance
A one-time repair is a good start. A long-term maintenance plan is what actually protects your investment. Professional exterior house painters who know this climate can assess your home’s specific exposure, identify the areas most vulnerable to moisture intrusion, and recommend a coating schedule that keeps your siding in good shape year after year. That kind of local expertise is hard to replicate with a generic checklist.
Brush Hour LLC works specifically in Vancouver and Battle Ground, which means the team understands the narrow painting windows, the substrate behavior in wet winters, and the coating systems that actually perform here. If you’d like a professional eye on your home’s exterior before another rainy season arrives, reach out to schedule an assessment. The right conversation now can save a full repaint later.
Your Home Deserves a Finish That Actually Lasts
Peeling paint is never just a cosmetic issue, especially in the Pacific Northwest. It’s a signal that moisture has found a way in, and the longer it goes unaddressed, the more damage it does to the wood underneath. Knowing how to fix peeling exterior paint correctly, from identifying the root cause to feathering edges and priming bare wood, is what separates a repair that holds through multiple wet seasons from one that fails before spring.
The two things that matter most? Thorough prep and the right timing. Get those right, and your results will show it.
If you’d rather have a local expert handle it, Brush Hour LLC has been serving Vancouver and Battle Ground since 2012. The team is licensed, bonded, and insured in Washington, and they bring a genuine 5-star reputation for precision and reliability to every project.
Get Your Free Exterior Painting Estimate from Brush Hour LLC Today!
Your siding works hard to protect your home. Give it the professional care it deserves.
Frequently Asked Questions About Fixing Peeling Exterior Paint
Can I paint over peeling paint if I use a thick primer?
No. A thick primer won’t save you here. If the paint beneath is loose, anything you apply on top will peel along with it. Primer bonds to the surface underneath it, not to failing paint. You need to scrape down to a sound edge first, then prime the bare substrate. Skipping that step and relying on a heavy primer coat is one of the most common reasons exterior repairs fail within a single season.
What is the best temperature to fix peeling exterior paint in Vancouver, WA?
Aim for surface temperatures between 50 and 85 degrees Fahrenheit, with air temperature staying above 50 for at least 24 hours after application. In Vancouver, that window typically opens in late spring and runs through early fall, though dry stretches in September and October can also work well. The surface itself matters as much as the air temperature, so check that shaded or north-facing walls have warmed sufficiently before you start.
How much does it cost to have a professional fix peeling paint?
We don’t publish pricing here because exterior painting costs vary widely based on your home’s square footage, siding condition, number of stories, and the extent of prep work required. The best way to get an accurate number is to request a direct estimate from a licensed contractor who can assess your specific situation in person. Contact Brush Hour LLC to schedule an assessment and get a quote built around your home’s actual needs.
Is peeling paint a sign of termites or dry rot?
Peeling paint alone isn’t a reliable indicator of termites, but it can absolutely signal dry rot. Press firmly on any soft-looking areas after you scrape. If the wood feels spongy or your fingertip leaves an impression, you’re likely dealing with rot that needs to be addressed before any coating work begins. Termite damage tends to look different, with hollow-sounding wood and visible galleries, but a professional inspection is the only way to rule it out with confidence.
How long should I wait after it rains to start painting?
Wait until the wood moisture content drops below 15 percent, which typically means at least 24 to 48 hours of dry weather after rain in this climate. Sunny, breezy days speed up drying considerably. Shaded walls and north-facing surfaces hold moisture longer than sun-exposed ones, so don’t assume the whole house is ready just because one side feels dry. A moisture meter takes the guesswork out of this entirely and is worth using before you prime.
What happens if I ignore peeling paint for another season?
The damage compounds quickly. Every exposed area of bare wood absorbs moisture through the wet months, and that moisture works deeper into the substrate with each rain cycle. What starts as a surface adhesion problem can become wood rot, which means replacing siding boards rather than just repainting them. Learning how to fix peeling exterior paint early is genuinely the cheaper path; the longer you wait, the more the repair scope expands beyond paint and into structural material.
Do I need to scrape the entire house if only one side is peeling?
Not necessarily, but don’t just treat the visible peeling and walk away. Inspect the rest of the exterior carefully, especially any walls with similar exposure or drainage patterns. If the affected side has a specific cause, like a clogged gutter or failed caulk at a window, address that source first. Spot repairs work well when the damage is genuinely isolated. If you find soft edges or hairline cracks spreading across other walls, those areas need prep attention too before moisture gets further in.
Why does my paint always peel on the south side of my house?
South-facing walls take the most direct sun exposure, which accelerates paint aging and drives solar vapor through the siding faster than shaded walls. The repeated cycle of intense heat followed by cool, wet evenings puts more stress on the paint film than any other elevation. This is also the side most likely to show moisture being pushed outward from inside the home. Using a breathable, 100% acrylic latex paint specifically rated for high-UV exposure makes a meaningful difference on south-facing surfaces.