
Have you noticed those small, jagged flakes of paint starting to curl away from your siding? It’s tempting to ignore them for one more season, but in the Pacific Northwest, that peeling paint is more than just a blow to your curb appeal. It’s an invitation for our relentless moisture to settle into your wood and cause real damage. If you’re feeling overwhelmed by the idea of endless scraping and sanding, you aren’t alone. Learning how to fix peeling exterior paint the right way is the difference between a quick fix that fails by next winter and a beautiful, protective finish that lasts for years.
We understand that your home is your biggest investment, and seeing it look weathered can be stressful. This guide walks you through the professional techniques needed to revitalize your exterior and shield it from the damp PNW climate. We’ll cover everything from essential surface preparation and lead-safe practices for older Vancouver homes to choosing high-performance paints that withstand our local weather. You’ll gain a clear path to a smooth, long-lasting finish and the confidence to know when a project is a satisfying DIY or when it’s time to call in a local expert.
Key Takeaways
- Learn to spot the difference between simple surface aging and deep moisture damage so you can address the root cause, not just the symptom.
- Master the professional steps for how to fix peeling exterior paint, including the exact moment to stop scraping and start sanding for a seamless finish.
- Discover why high-quality primers and specific sandpaper grits are non-negotiable for ensuring your new paint job survives a wet Pacific Northwest winter.
- Find out the “Goldilocks” weather window in Vancouver, WA, and why back-priming is the secret weapon for long-term siding protection.
- Understand the clear signs that a project has grown beyond a weekend DIY and when hiring a professional painting contractor is the safest, most cost-effective choice.
Identifying the Culprit: Why Is Your Exterior Paint Peeling?
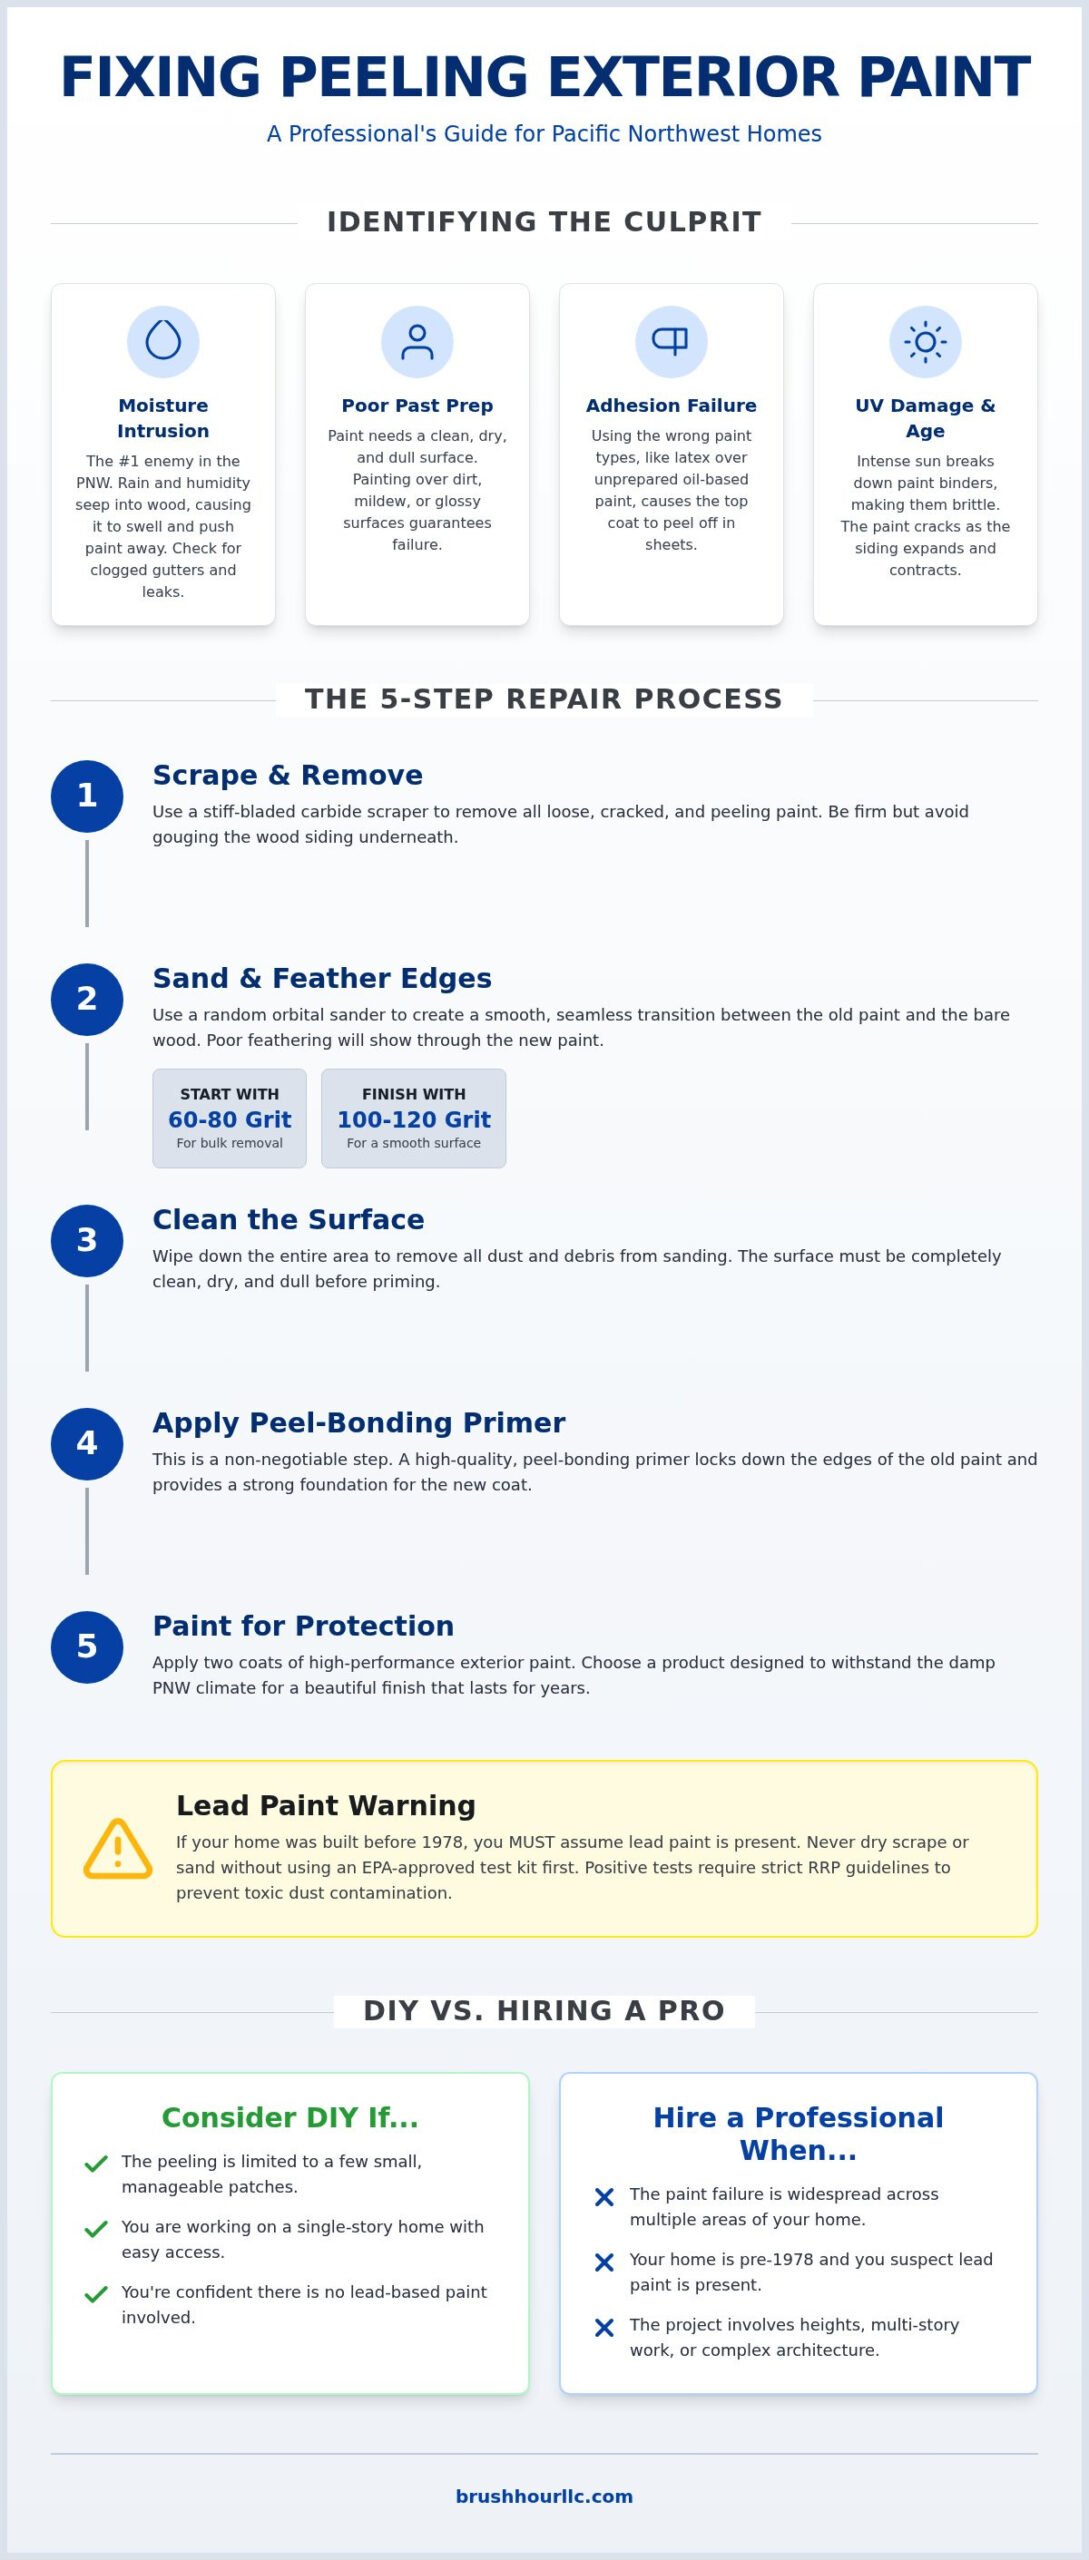
Before you dive into the hard work of how to fix peeling exterior paint, you need to play detective. Why did the failure happen in the first place? If you don’t solve the underlying issue, your fresh coat of paint will likely end up on the grass within a year. Is the paint cracking in small, rectangular patterns, or is it falling off in large, thin flakes? The answer tells us if the problem is age, moisture, or a mistake made during the last paint job.
Many homeowners feel tempted to just scrape the loose bits and paint right over the rest. Don’t do it. This approach is a recipe for disaster. If the old paint has lost its grip, the weight and tension of a new coat will pull the remaining old paint away from the siding. You’ll end up with an even bigger mess to clean up later. Look closely at the texture of the failure. “Alligatoring” looks like reptile scales and usually points to internal tension in the paint layers. Flaking or peeling usually means the bond between the paint and the wood has been severed completely.
Moisture: The #1 Enemy of Vancouver Exteriors
In our part of the Pacific Northwest, moisture is the most common reason for paint failure. Our relentless rain can soak into the wood fibers, causing them to swell and push the paint away from the surface. Have you checked your gutters lately? Localized peeling near the roofline often signals a leak or a drainage problem that keeps the siding constantly damp. Even the high humidity and heavy morning dew in Battle Ground can interfere with how paint cures. This moisture prevents the binders from forming a solid shield, which is a key part of understanding paint composition and longevity.
Adhesion Failure and Poor Past Prep
Sometimes the problem started years ago during the last application. Paint needs a clean, dry, and dull surface to grab onto. If the previous contractor painted over dust or mildew, the bond was doomed from the start. We also see many issues with mismatched materials. Applying a standard latex paint directly over old oil-based paint without the right primer causes the top layer to peel off in sheets. Finally, don’t underestimate the summer sun. Intense UV rays break down the binders in the paint, making it brittle. Once the paint loses its flexibility, it can’t handle the natural expansion and contraction of your home’s siding.
Essential Tools and Safety for Repairing Flaking Paint
Ready to get your hands dirty? Before you start learning how to fix peeling exterior paint, you need the right gear. Using the wrong tool can damage your siding or leave you with a finish that fails by next winter. Professionals don’t just grab a scraper and hope for the best; they use a specific kit designed for Vancouver’s unique conditions. Your goal is to create a surface so smooth and clean that the new paint has no choice but to stick.
Your “Must-Have” list should include the following items to ensure a professional result:
- Stiff-bladed carbide scrapers for bulk removal
- Random orbital sander for feathering edges
- High-quality peel-bonding primer
- Respirator with P100 filters for lung protection
- Heavy-duty canvas drop cloths to catch every chip
Your choice of sandpaper grit determines the final look of your home. Start with a coarse 60 or 80 grit to remove the bulk of the flaking material. Once you hit solid wood, switch to a finer 100 or 120 grit to smooth the surface. This level of detail is vital because poor surface prep is cited in the Purdue University Extension guide on paint failure as a leading cause of premature peeling. If this equipment list feels a bit overwhelming, remember that a professional painting contractor already has these high-end tools ready to go.
The Lead Paint Warning (Pre-1978 Homes)
Does your home date back to before 1978? If so, you must assume lead paint is present until you test it. Never dry sand or scrape lead-based paint without proper training. This creates toxic dust that settles in your soil and your lungs. We recommend using an EPA-approved lead test kit before any disturbance begins. If the test is positive, you’ll need to follow strict Renovation, Repair, and Painting (RRP) guidelines. This includes setting up a containment zone with heavy-duty plastic and using HEPA-filtered vacuums to manage every single paint chip.
Professional-Grade vs. DIY Equipment
Should you use a heat gun or a chemical stripper? For thick, stubborn layers, a heat gun can soften the paint for easier removal. Just be careful not to scorch the wood. When it comes to sanding, an orbital sander is your best friend. It helps you “feather” the edges where the old paint meets the bare wood, creating a smooth transition that won’t show through the topcoat. Don’t skimp on your brushes either. A high-quality synthetic brush holds more primer and lays it down more evenly than a bargain-bin option, ensuring the foundation of your paint job is rock solid.
The Step-by-Step Process to Fix Peeling Exterior Paint
Ready to transform your home’s exterior? Following a structured sequence is the only way to ensure your hard work lasts. If you skip a step or rush the drying time, the PNW moisture will find its way back under your new finish. Here is the professional roadmap for how to fix peeling exterior paint so it stays beautiful for years.
Step 1 begins with a thorough cleaning. Use a garden hose and a soft brush to remove dirt, mildew, and salt spray. While pressure washers are effective, use them with extreme caution. High pressure can inject water deep into the wood grain or behind siding boards. This trapped moisture is a leading cause of rot and will cause your new paint to bubble. Give your home at least 48 hours of dry weather to fully dry out after washing.
Step 2 involves scraping away the loose material. Use your carbide scraper to remove everything that isn’t firmly attached. How do you know when to stop? You must reach a “sound” edge. If you can still slide a putty knife under the edge of the paint, it needs to come off. During this phase, check for soft or spongy wood. If your scraper sinks into the board, you aren’t just dealing with a paint failure. You’ve found wood rot. In these cases, patching is a temporary fix; replacing the damaged siding board is the only way to protect your home’s structure.
Scraping and Sanding for a Seamless Look
Ever seen a house where you can clearly see the “craters” from old repairs? That happens when you skip feather-sanding. Use an orbital sander with 80-grit paper to smooth the transition between bare wood and the remaining paint. Your goal is to eliminate the sharp edge so the repair feels flush to the touch. Be careful not to gouge the wood by keeping the sander moving at all times. Once finished, remove all dust with a tack cloth or a damp rag. Primer cannot bond to a dusty surface.
The Critical Role of Specialized Primers
Which primer is right for your project? For most Vancouver homes, a high-quality peel-bonding latex primer is a lifesaver. These products are thicker than standard primers and are designed to “glue” down the edges of old paint while filling in minor surface imperfections. However, if you have cedar or redwood siding, an oil-based primer is often better at blocking tannins from bleeding through. Wait for the primer to dry completely. In our humid climate, this usually takes a full 24 hours before you apply the first topcoat. When you finally apply your finish, use two coats of premium exterior paint for how to fix peeling exterior paint with maximum durability.
Professional Secrets to Preventing Future Paint Failure
Once you’ve mastered how to fix peeling exterior paint, you want those results to last a decade, not just a season. The secret isn’t just in the application; it’s in the strategy you use to fight our local climate. In Vancouver and Battle Ground, the “Goldilocks” window for painting is typically between May and October. You need a reliable stretch of dry weather with temperatures staying between 50°F and 85°F. Painting outside this window often leads to poor curing and early failure.
If your project involves replacing damaged siding, never skip back-priming. This means sealing the back and all four edges of the board before it’s nailed to the wall. This simple step stops moisture from the inside of your home from soaking into the wood and pushing the paint off from the behind. Combine this with annual gutter maintenance. When gutters overflow, water runs directly down your siding, creating a constant soak-and-dry cycle that even the best paint can’t survive. A quick annual inspection every spring can help you spot tiny cracks or “alligatoring” before they turn into a major scraping project.
Managing Moisture Around the Foundation
Your landscaping plays a huge role in the health of your paint. Plants or shrubs touching your siding trap humidity against the surface, preventing the wood from drying out after a rainstorm. Aim to keep all vegetation trimmed at least 12 inches away from your home’s exterior. Also, check for “splash back” from decks and patios. If rain hits a hard surface and bounces onto your siding, that area will likely peel first. Ensuring proper ventilation behind your siding boards allows the house to “breathe,” which is essential for long-term adhesion.
Selecting the Right Paint for the PNW
In our damp environment, the type of paint you choose is just as important as the prep work. High-quality, breathable paints are essential for wood siding because they allow internal moisture to escape without causing blisters. Look for premium options like Sherwin-Williams Duration or Benjamin Moore Aura Exterior. These professional-grade products are formulated for low-temp applications, making them safer for our unpredictable spring and fall days. While a satin sheen is popular for its aesthetics, it also provides better moisture resistance and is easier to clean than flat finishes. If you want to ensure your home is protected by the best materials and techniques, our team at Brush Hour LLC is here to help as your local painting contractor.
When to DIY vs. Hiring a Professional Painter in Vancouver, WA
Deciding between doing it yourself or calling in the pros often comes down to your tolerance for labor. If you’re dealing with a single window sill, learning how to fix peeling exterior paint is a rewarding Saturday project. But what happens when the peeling spreads across your entire second story? A small touch-up can quickly transform into a full repaint that consumes every weekend for a month. You have to ask yourself if the physical toll and time commitment align with your goals for the season.
Safety is the biggest factor for most Vancouver homeowners. Are you comfortable on a 24-foot extension ladder while operating a power sander? Ladder accidents remain a top cause of serious home injuries. Professional exterior house painters have the specialized equipment and safety training to handle high peaks and difficult angles without risk to your family or property. They also have the crew size to finish in days what might take a solo homeowner weeks to complete.
Consider the long-term cost-benefit of your time. By the time you buy professional-grade scrapers, an orbital sander, high-end primers, and enough premium paint for two coats, your material costs will be significant. A professional job is estimated to last up to three times longer than a typical DIY effort. In the Pacific Northwest, where moisture is constant, that extra durability means you won’t have to think about how to fix peeling exterior paint again for another 12 to 15 years. It’s an investment in your home’s structure as much as its beauty.
The Brush Hour LLC Difference
We take the stress out of home maintenance with a methodical approach. Our team focuses heavily on the preparation steps we’ve discussed, ensuring every surface is clean, dry, and sound before the first drop of paint is applied. As a licensed and insured contractor, we also handle the complex lead-safe work and environmental cleanup required for older Vancouver homes. You get the relief of a beautiful transformation without the physical toll of the labor or the worry of underlying wood damage.
Your Next Steps for a Beautiful Home
Ready to see your home revitalized and protected? A professional consultation is the easiest way to understand the current health of your siding and paint. We’ll provide a precise quote that covers everything from detailed surface prep to the final protective topcoat. There’s no pressure; just honest, neighborly advice from your local experts who understand the challenges of our climate. Contact Brush Hour LLC for a free estimate today!
Ready to Restore Your Home’s Curb Appeal?
Dealing with flaking siding is more than an aesthetic headache; it’s a critical maintenance task for any homeowner in the Pacific Northwest. By now, you understand that knowing how to fix peeling exterior paint starts with identifying moisture sources and mastering the art of feather-sanding. Whether you choose to tackle the prep work yourself or hand the heavy lifting to a pro, the goal remains the same: a durable finish that stands up to our local rain and humidity.
As Vancouver and Battle Ground’s trusted local experts, Brush Hour LLC is here to ensure your home stays protected. We are fully licensed, bonded, and insured, specializing in the specific moisture-resistant techniques needed for our unique climate. Why spend your entire summer on a ladder when you can enjoy professional, long-lasting results? Take the first step toward a beautiful, revitalized exterior today.
Get Your Free Exterior Painting Estimate from Brush Hour LLC
Your home is your biggest investment. We look forward to helping you protect it with a finish you’ll be proud of for years to come!
Frequently Asked Questions
Can I just paint over peeling paint if I use a thick primer?
No, you shouldn’t. New paint is only as strong as the layer underneath it. If the old paint has already lost its grip on the wood, the tension of a fresh coat will pull those loose flakes right off the wall. You must scrape and sand down to a sound edge first. While high-build primers help smooth the surface, they can’t fix a bond that’s already broken.
What is the best temperature to fix peeling paint in Vancouver, WA?
The ideal window is between 50°F and 85°F. In Vancouver and Battle Ground, this usually happens from May through October. You also need to watch the humidity. If it’s too damp, the paint won’t cure properly. Always check the forecast for a 48-hour stretch of dry weather to ensure your hard work actually sticks to your siding for the long haul.
How much does it cost to have a professional fix peeling exterior paint?
Costs depend on your home’s size and the level of preparation needed. Factors like the height of the building and the severity of the damage play a big role. While DIY materials might seem cheaper, a professional job typically lasts three times longer. For a precise figure, it’s best to have a local expert provide a personalized walkthrough and estimate for your specific project.
Do I have to scrape off all the paint if only some areas are peeling?
No, you only need to remove the paint that has failed. Use a carbide scraper to find the “sound” edges where the remaining paint is still firmly attached. Once you’ve cleared the loose material, you can feather-sand those spots to create a smooth transition. This is a vital step when learning how to fix peeling exterior paint without the need to strip the entire house.
Is peeling paint a sign of wood rot?
It certainly can be. Peeling is often caused by moisture trapped behind the paint, which is the same ingredient that fuels rot. While you’re scraping, check if the wood feels soft or spongy. If your scraper sinks into the board, the wood has likely started to decay. In these cases, you’ll need to replace the damaged siding before you can safely apply any new primer or paint.
How long should I wait after pressure washing before I start painting?
Wait at least 48 hours during dry weather. Wood is porous and acts like a sponge when hit with high-pressure water. If you paint over damp siding, that trapped moisture will eventually try to escape, pushing your new finish right off the surface. In our humid local climate, giving the wood extra time to dry is the best way to ensure your new paint job lasts.
What happens if I ignore peeling paint for another season?
The damage will only get worse. Once the paint film is broken, rain and morning dew soak directly into the wood grain. This causes swelling, warping, and eventually structural rot. What is currently a straightforward scraping and painting project could quickly turn into an expensive siding replacement. Acting now saves you money and protects the structural integrity of your home’s exterior walls.
Why is my paint peeling only on the south side of my house?
The south side usually takes the most abuse from the sun. Intense UV rays break down the binders in the paint, making it brittle over time. This side also sees the most extreme temperature swings, causing the wood to expand and contract rapidly. This constant movement eventually snaps the bond of older paint, leading to the localized flaking and cracking you’re seeing on that specific wall.