
In the Pacific Northwest, your paint job is only as strong as the dirt and moisture trapped beneath it. It’s a hard truth, but even the most expensive gallon of paint won’t stay on your siding if the surface isn’t ready for it. If you’ve noticed peeling flakes or wondered if that soft spot on the trim is mold, you aren’t alone. Many homeowners feel a bit overwhelmed when thinking about the exterior house painting preparation Battle Ground weather requires. You want a home that looks fresh and stays protected, but how do you know which repairs are urgent and which are just cosmetic?
We understand that the thought of high-pressure water near your windows or the mess of scraping old paint is enough to make anyone hesitate. That’s why we’ve put together this guide to show you exactly how to get a finish that lasts ten years or more. You’ll discover the exact steps required to prep your home for a flawless, long-lasting exterior paint job that withstands our unique climate. We will walk through everything from professional pressure washing techniques to identifying wood rot before it spreads. By the end, you’ll have a clear roadmap to boost your curb appeal and protect your biggest investment.
Key Takeaways
- Effective exterior house painting preparation Battle Ground homes require starts with moisture management to prevent peeling and mold growth.
- Learn how to choose between pressure washing and soft washing to remove PNW moss and algae without damaging your siding.
- Discover why meticulous scraping and feather-sanding are the essential steps for creating a smooth bond that lasts a decade or more.
- Use our homeowner checklist to clear your perimeter and trim back greenery, ensuring a safe and efficient workspace for your painting crew.
- Understand the value of professional-grade equipment and specialized surface restoration in protecting your home from the harsh local climate.
Why Exterior House Painting Preparation is Critical in Battle Ground
Ever wonder why some paint jobs look great for a decade while others flake off after just two years? It usually comes down to what happened before the brush even touched the wall. Exterior house painting preparation is the process of cleaning, repairing, and priming to ensure a chemical bond between your home and its new shield. In our corner of the Pacific Northwest, your paint is only as good as the surface beneath it.
Thorough exterior house painting preparation Battle Ground homeowners prioritize is the best way to prevent premature failure. It’s an investment in your home’s health, not just its color. By focusing on the foundation first, you ensure the final result is both beautiful and durable. Skipping these steps might save a few hours today, but it often leads to spending thousands on a full redo long before you expected to.
The Dangers of Skipping the Prep Work
What happens when you paint over a surface that hasn’t been properly vetted? The results are almost always frustrating and expensive. When prep is neglected, you can expect several common failures:
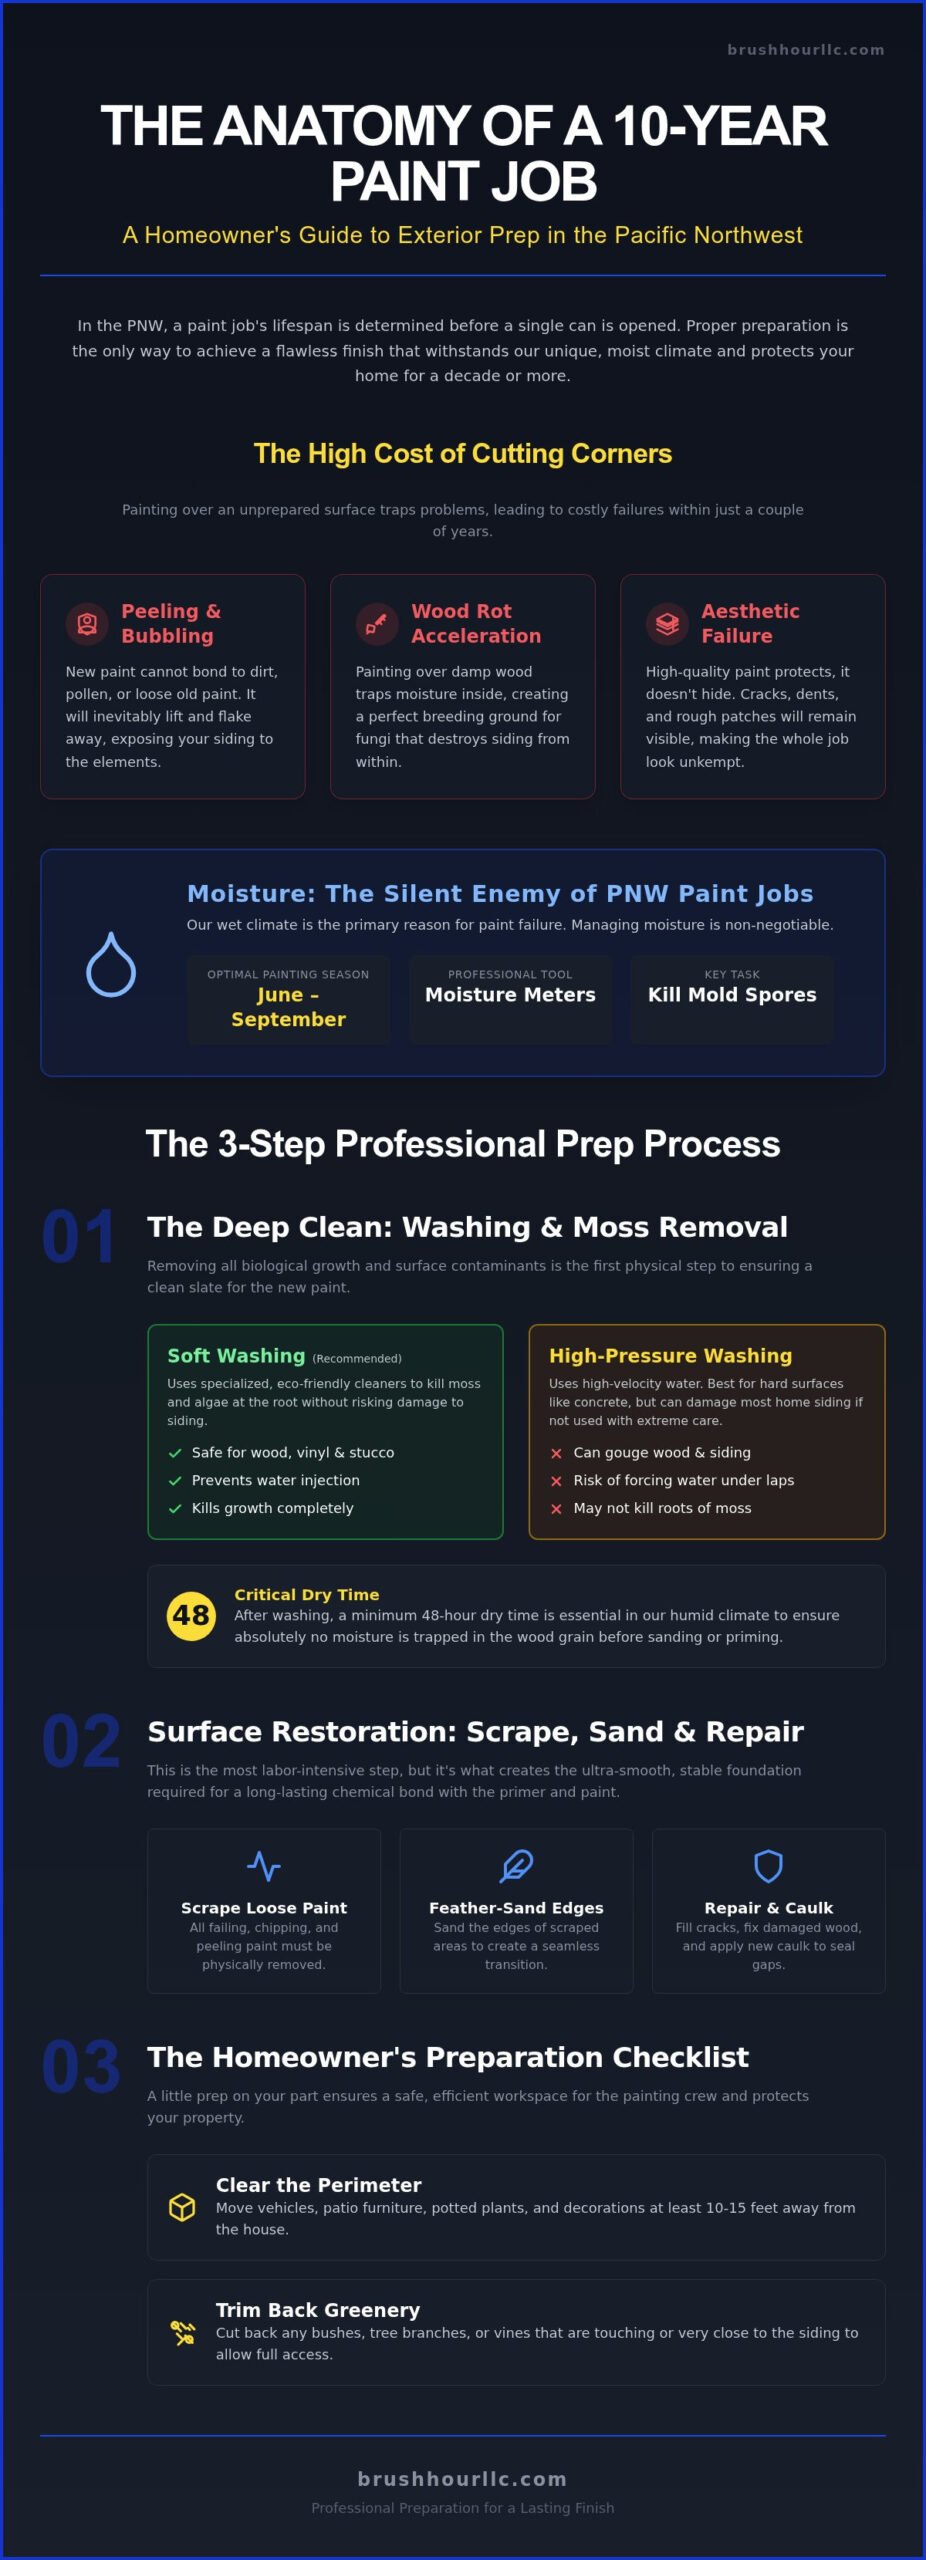
- Peeling and bubbling: Paint won’t stick to dirt, pollen, or loose old flakes. It will eventually pull away, leaving your siding exposed.
- Wood rot acceleration: If you paint over damp wood or existing rot, you’re essentially sealing the moisture inside. This creates a perfect environment for fungi to destroy your siding from the inside out.
- Aesthetic failure: High-quality paint is designed to protect, not to hide structural flaws. Cracks, dents, and rough patches will show right through the finish, making the entire house look unkempt.
Moisture: The Silent Enemy of PNW Paint Jobs
Battle Ground is beautiful, but it’s also incredibly wet. Moisture is the primary reason paint fails in our region. To combat this, we have to respect the climate. This means waiting for the “dry window,” which typically runs from June through September. Humidity levels must be low enough for the wood to release trapped vapor before we apply a single drop of primer.
Don’t guess when it’s dry enough. Professionals use moisture meters to test the siding before starting. If the wood is too damp, the paint will never form that essential bond. Managing moisture also prevents mold and mildew from growing under your new finish. If you don’t kill the spores during the cleaning phase, they’ll simply continue to thrive beneath the paint, eventually causing dark stains or health concerns for your family. Proper prep ensures your home stays dry and protected for years to come.
The Deep Clean: Washing and Moss Removal
Have you looked closely at the north side of your home lately? In our region, it’s almost a guarantee that you’ll find a layer of moss, algae, or lichen making itself at home. Removing this biological growth is the first major step in the exterior house painting preparation Battle Ground homes require for a lasting finish. If you paint over these living organisms, they’ll continue to grow under the new coat, eventually causing the paint to bubble and pop off. This thorough cleaning is the only way to guarantee your home is ready for a fresh start.
Should you use high pressure or a softer touch? It depends on your siding. While hard surfaces like brick can handle more power, most residential siding benefits from “soft washing.” This method uses specialized cleaners to kill the moss and algae at the root without the risk of gouging the wood or forcing water behind the laps. Once the wash is complete, the most important thing you can do is wait. In our local humidity, we recommend a minimum 48-hour dry time before moving to the next stage. This ensures no moisture is trapped in the grain. Failing to account for these environmental factors is the most common mistake in exterior house painting preparation Battle Ground residents make during DIY projects.
Pressure Washing Done Right
Washing isn’t just about pointing a nozzle. You have to be careful about “injection,” which happens when water is sprayed upward under the siding laps. This can lead to hidden mold growth and structural damage. You also need to look for “chalking.” If you rub your hand across the old paint and a powdery residue comes off, that’s oxidation. This layer must be completely removed, or the new paint won’t stick. Don’t forget the eaves and soffits, either. These areas are magnets for dust and spider webs that can ruin a smooth finish.
Eco-Friendly Cleaning Solutions
We know how much you value your landscaping. Our local Clark County gardens are precious, so we prioritize biodegradable cleaners that won’t harm your pets or the local wildlife. For heavy-traffic areas or spots near kitchen vents, we might use Trisodium Phosphate (TSP) to cut through grease and grime. If your home is near a wooded area, a simple rinse won’t cut it. Lichen and moss have “roots” that cling tightly to the surface. Professional-grade solutions are the only way to ensure the siding is truly sterile. If you’re feeling overwhelmed by the technical side, working with a residential painter who understands these local challenges can provide total peace of mind.
Surface Restoration: Scraping, Sanding, and Repairs
Once your home is clean and dry, the real transformation begins. This phase is where we separate a standard paint job from a professional restoration. Exterior house painting preparation Battle Ground homeowners can trust involves more than just a quick visual check. It requires getting up close with every square inch of your siding to find where the old finish is failing. If you skip the manual labor of scraping and sanding, your new paint will simply sit on top of a crumbling foundation. It won’t be long before those old layers pull the new ones right off the wall.
Scraping removes the loose, flaking paint that has lost its grip. After scraping, we move into feather-sanding. This is the process of bridging the gap between the bare wood and the remaining old paint. Without feather-sanding, you’ll see a visible “cliff” or ridge where the old paint ends. By smoothing these edges, we ensure the new coat looks seamless. While you’re working, keep an eye out for siding failure. If the wood feels soft or crumbles when you touch it, a simple patch won’t suffice. In these cases, experienced exterior house painters will recommend replacing the board entirely to stop rot from spreading to your home’s framing.
The Art of Caulking and Sealing
Caulking is your home’s primary defense against the driving PNW rain. We focus heavily on “wet zones” like windowsills, door frames, and trim joints where water tends to pool. It’s vital to use a high-quality, elastomeric caulk that can handle the temperature fluctuations we see in Clark County. This material stretches and shrinks as your house breathes, preventing cracks. One critical tip: never caulk the “weep holes” at the bottom of your siding. These small gaps are designed to let moisture escape from behind the boards. If you seal them shut, you’re inviting wood rot to move in.
Wood and Siding Repairs
Minor damage doesn’t always require a full replacement. High-grade wood fillers work wonders for small cracks or holes left behind by curious woodpeckers. However, if a trim board is significantly soft, we prefer replacing it over using liquid hardeners. The strategy also changes based on your siding material. Fiber cement, often called HardiePlank, requires specific sealants and careful handling to avoid cracking the edges. Traditional cedar siding, on the other hand, needs to be primed on all sides if you’re installing a new piece. This “back-priming” prevents the wood from soaking up moisture from the inside out. Taking the time to do these repairs correctly is the hallmark of thorough exterior house painting preparation Battle Ground homes need to stay healthy.
The Homeowner’s Preparation Checklist
While the pros handle the heavy lifting, the homeowner plays a vital role in the project’s workflow. Think of it as clearing the stage before a big performance. While we handle the technical side of exterior house painting preparation Battle Ground homes require, there are a few things you can do to help the project run smoothly. First, take a look at your landscaping. We need a 12-18 inch gap between your siding and any shrubs or trees. This gives the crew room to move and prevents wet branches from brushing against fresh paint. Next, clear the perimeter. Move patio furniture, grills, and potted plants away from the house to a safe distance.
Don’t forget your automated systems. Turn off your sprinklers entirely during the project. A surprise mid-afternoon soak can ruin hours of work and trap moisture under the new finish. Finally, please ensure all windows are tightly closed and remove any window screens. This allows us to paint the trim thoroughly without anything getting in the way or causing a mess inside your home.
Exterior Access and Safety
Success depends on easy access to the job site. Please unlock your side gates and keep your pets safely indoors while we work. We’ll also need to identify a few reliable outdoor power outlets for our tools and sprayers. If you have fragile prize roses or a hidden septic lid in the yard, let us know during our first morning on-site. We want to be as careful with your property as you are, and clear communication helps us avoid any accidents.
Color Selection and Final Walkthrough
Choosing a color in Battle Ground can be tricky because our light changes so much. A color that looks great on a sunny July afternoon might feel too dark during a gray November morning. Always test your samples on different sides of the house to see how they react to our unique lighting. If you live in an HOA, double-check your CC&Rs to ensure your choice is approved before we start. Once the colors are set, we’ll do a “pre-paint” walkthrough together. This final check ensures the exterior house painting preparation Battle Ground weather demands has been executed to the highest standard. If you’re ready to get started with a team that respects your home, hire a professional painting contractor today.
Why Professional Preparation Wins: The Brush Hour Difference
Why take on the stress of wobbly ladders and heavy machinery yourself? When you choose a licensed and insured painting contractor, you aren’t just paying for labor. You’re investing in professional-grade equipment that ensures a superior finish. We use high-reach ladders to access every corner of your gables safely and industrial-strength sprayers that provide even coverage without the streaks common in DIY projects. Our HEPA sanders even capture dust at the source, keeping your air and yard clean. This level of technical detail is what makes the exterior house painting preparation Battle Ground homes need so effective.
We believe in being a “helpful local expert” rather than just another service provider. This means we take the time to explain the “why” behind every step of our process. Whether it is identifying a specific type of wood rot or explaining why a certain primer is best for your siding, we want you to feel confident in the work being done. We treat your home like our own, ensuring the final result is something we would be proud to show off to our own neighbors.
Precision Craftsmanship in Every Step
Our team follows a methodical workflow designed to protect your home. We spend significant time masking and shielding your windows, decks, and walkways before any paint is opened. Have you ever seen a paint job with overspray on the glass? It’s a sign of rushed prep. We also prioritize priming every bare spot of wood or siding. This isn’t an optional step for us; it’s the only way to prevent future peeling and ensure the topcoat bonds correctly. This organized approach gives you peace of mind that nothing is being overlooked.
Serving the Battle Ground Community
We live and work right here in Clark County. This means we understand the specific HOA requirements in local neighborhoods and the unique challenges our weather presents. Are you looking for residential painting near me that treats your property with respect? We pride ourselves on maintaining clean job sites and being good neighbors while we work. We focus on clear communication and a tidy perimeter, so your daily life isn’t disrupted more than necessary.
Ready for a transformation that lasts? Proper exterior house painting preparation Battle Ground weather requires is a big job, but you don’t have to do it alone. Let our local experts handle the difficult technical work so you can simply enjoy the results. Get your free exterior painting estimate today and see the Brush Hour difference for yourself.
Ready to Protect and Revitalize Your Home?
Giving your home a fresh look is exciting, but the real magic happens long before the first drop of color is applied. We have explored why thorough exterior house painting preparation Battle Ground homes require is the only way to beat our wet climate. From the deep clean that kills moss to the precision repairs that stop wood rot, every detail matters. You now have a roadmap for success and a checklist to ensure your property is ready for the transformation ahead.
Why handle the stress of wobbly ladders and industrial cleaners yourself? Brush Hour LLC provides a methodical, transparent preparation process that takes the guesswork out of home improvement. We are fully Licensed, Bonded, and Insured in Washington, bringing expert local knowledge of Battle Ground and Vancouver homes to every project. We treat your siding with the same care we would give our own families’ homes. Schedule Your Free Exterior Painting Consultation with Brush Hour LLC. Let’s work together to create a finish that stands the test of time and makes you proud to pull into the driveway.
Frequently Asked Questions
How long does the preparation phase usually take for a house in Battle Ground?
Most prep projects take between two and four days, depending on your home’s size and current condition. A standard 2,000 square foot home often requires one day for a deep wash and 48 hours of drying time. We then spend a full day on scraping, sanding, and caulking. While it’s tempting to rush, taking this time ensures the surface is perfect for the paint to bond correctly.
Can I do the pressure washing myself to save money on the project?
You can, but it’s often safer to let the pros handle it. Professional exterior house painting preparation Battle Ground homes require often involves “soft washing” rather than high-pressure blasting. DIY machines can easily gouge wood siding or force water behind the laps, leading to hidden mold. We use industrial equipment and specialized cleaners that kill moss at the root without damaging your property or window seals.
What happens if it rains during the preparation or painting process?
We pause the work immediately. Moisture is the primary cause of paint failure in the Pacific Northwest, so we never work on damp surfaces. If a surprise shower hits during the prep phase, we wait for the siding to dry completely before applying any caulk or primer. We monitor humidity levels closely to ensure your home is ready. It’s better to wait a day for dry weather than to trap moisture under your new finish.
Do I need to be home while the painters are doing the prep work?
No, you don’t need to stay home while we work on the exterior. As long as we have access to the property and your side gates are unlocked, we can handle everything. We just ask that you keep pets safely indoors and identify which outdoor power outlets we can use for our tools. We’ll stay in touch via text or phone to keep you updated on our daily progress.
How do I know if my siding needs to be replaced instead of just painted?
Look for soft spots or wood that crumbles when touched. If you can easily push a screwdriver into a trim board, that’s a sign of rot that paint can’t fix. During our initial walkthrough, we’ll help you identify which boards have reached the end of their lifespan. While we handle minor repairs and filling, significantly damaged siding should be replaced to protect your home’s structural integrity from our local rain.
Is lead paint testing required for my Battle Ground home before prep begins?
If your home was built before 1978, lead testing is a standard safety requirement. Lead-based paint requires specific containment and disposal procedures during the scraping and sanding phases. We take these regulations seriously to protect your family and the local environment. If your property falls into this age range, we’ll ensure the exterior house painting preparation Battle Ground laws demand is followed safely and legally from start to finish.
Should I remove my own window screens or will the painters handle that?
We recommend that homeowners remove their own screens before the project begins. This keeps them safe from dust and accidental splashes during the washing and painting phases. Removing them also gives us full access to the window trim for a much cleaner finish. If you have a few screens that are particularly difficult to pop out, just let us know. We’re happy to help you with the tricky ones.