
Is your home’s trim just a decorative detail, or is it actually the only thing standing between your structure and expensive dry rot? In the Pacific Northwest, those small strips of wood around your windows and roofline do the heavy lifting when it comes to moisture protection. If you’ve noticed peeling paint on your fascia or soffits, you’re likely feeling that familiar Vancouver worry. Will the next rainy season lead to a massive repair bill? It’s a common concern for many of our neighbors, especially when reaching those high peaks feels nearly impossible without the right gear.
We understand the pressure to keep your home safe while making it look its best. That’s why we’ve put together this expert guide on exterior trim painting Vancouver WA to help you navigate the process with confidence. You’ll learn how the right professional approach can shield your home from our unique climate while dramatically boosting your curb appeal. We’ll walk through the best weather-adaptive paints for our region, the secrets to proper surface prep, and what to expect during a professional transformation. Let’s get your home ready to face the elements with style.
Key Takeaways
- Learn how your home’s trim acts as a vital seal against moisture to prevent expensive dry rot repairs.
- Discover why professional exterior trim painting Vancouver WA focuses on high exposure areas like fascia boards and window sills.
- Understand why thorough preparation is the secret to a finish that lasts over a decade in our wet climate.
- Identify the best moisture resistant materials and why standard self priming paints aren’t always enough for bare wood.
- See how expert help keeps you off the ladder while providing the specialized tools needed for a clean, revitalized look.
Why Exterior Trim Painting is Crucial for Vancouver, WA Homes
Have you ever wondered why your window sills or roofline boards seem to peel faster than the rest of your house? It isn’t just bad luck. Your exterior trim acts as the primary seal for your home’s entire structure. Think of it as the weatherstripping for your architecture. While siding covers large flat surfaces, the trim protects the vulnerable joints where different materials meet. In our region, high-quality exterior trim painting Vancouver WA is the difference between a dry home and a damp, rotting disaster.
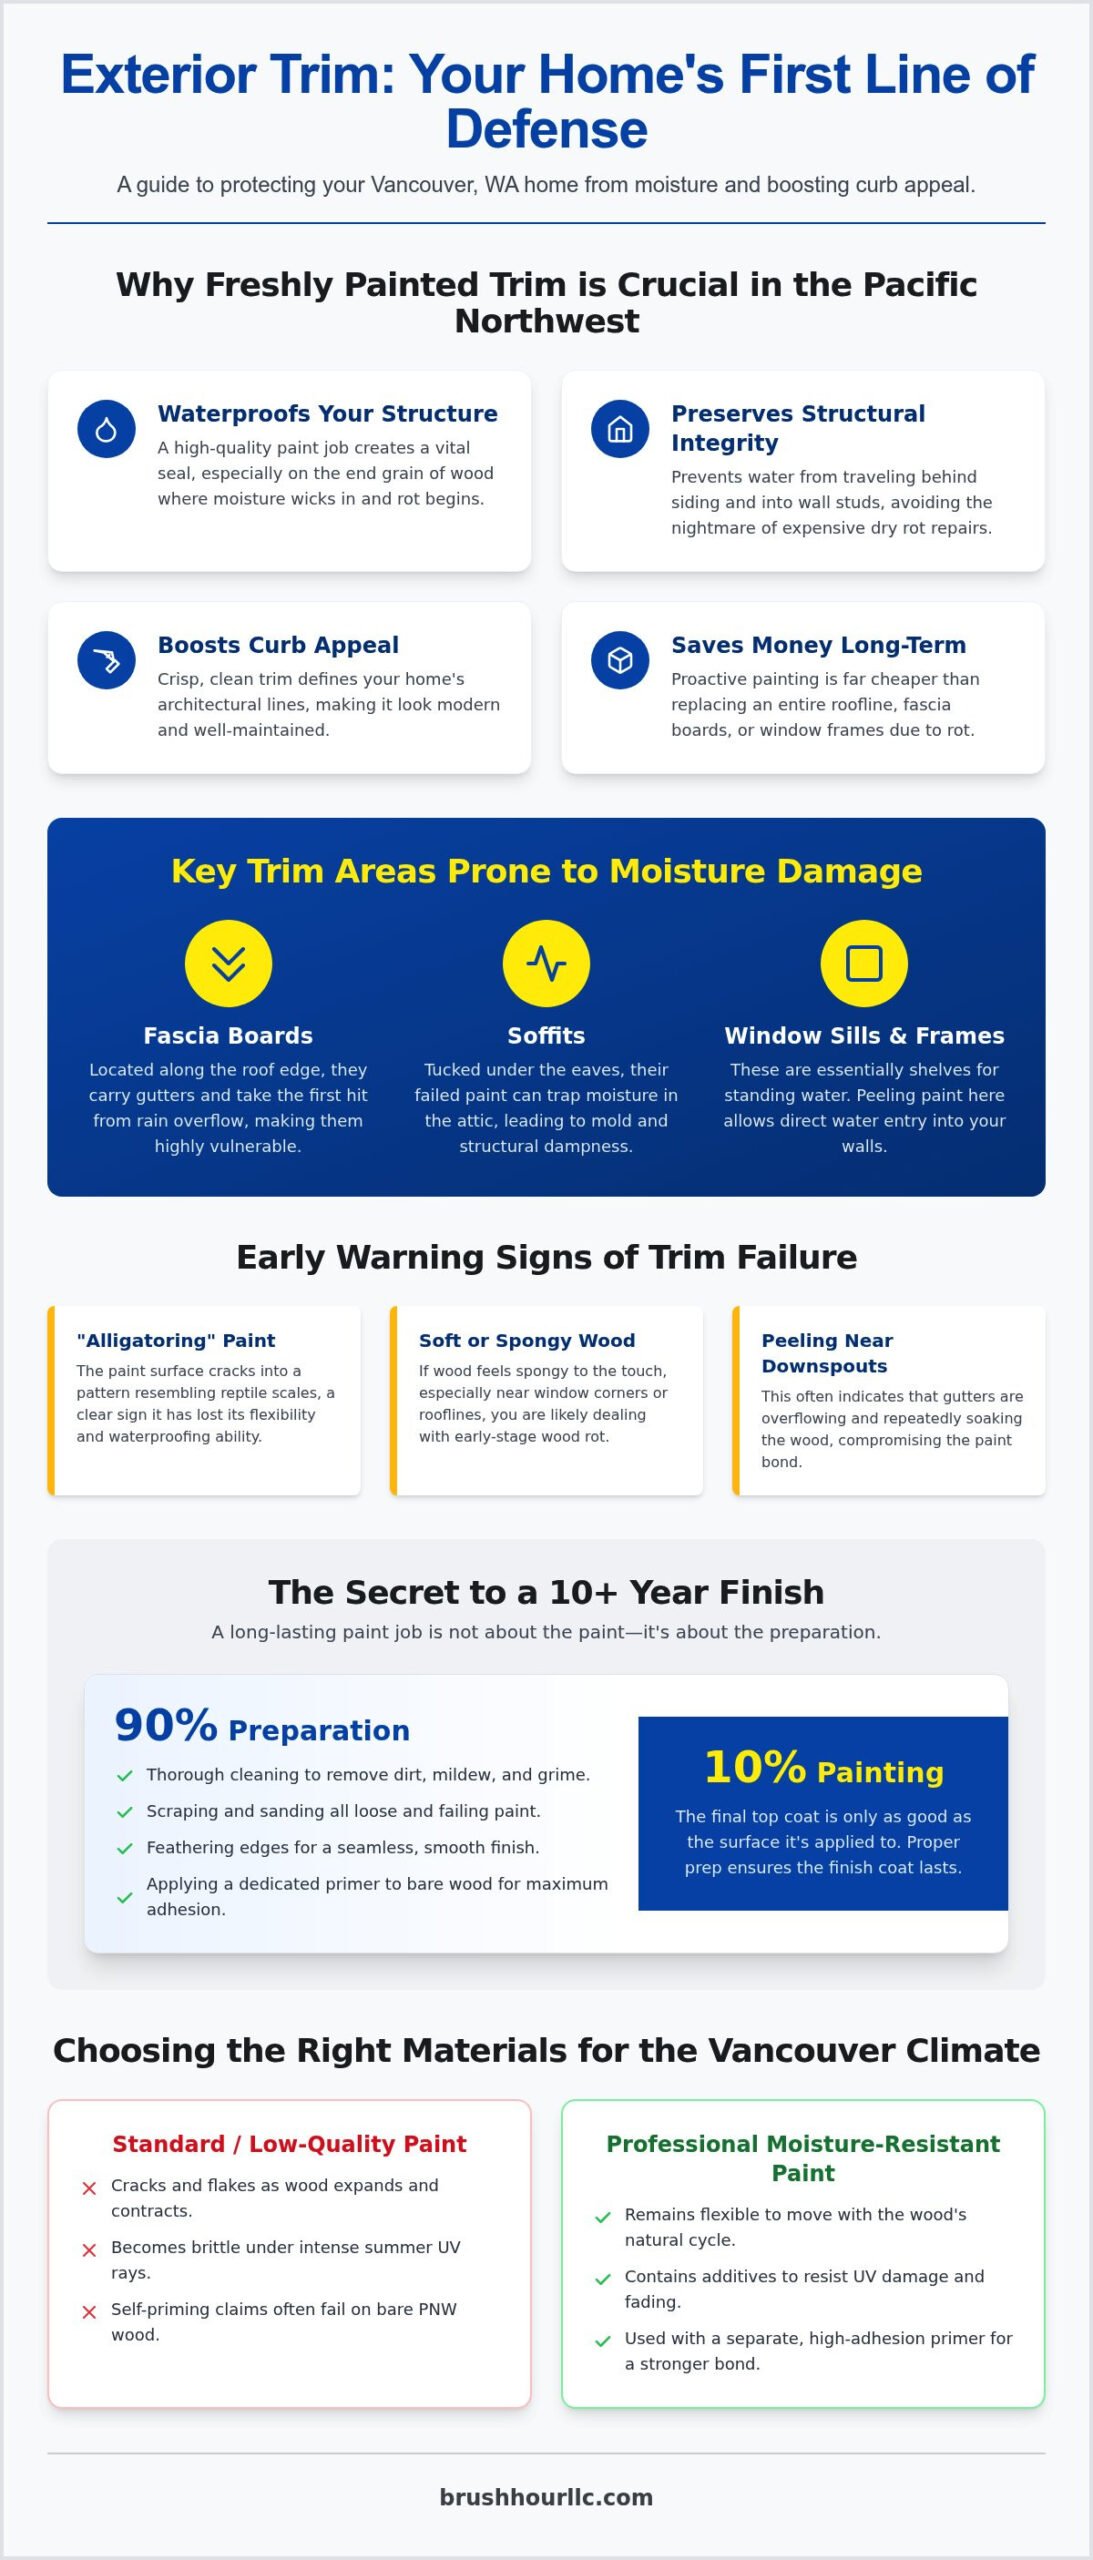
Fascia boards and window sills take the hardest hits from our local weather. Fascia boards sit right under your gutter line, catching every drop of overflow during a heavy downpour. Window sills are essentially shelves for standing water. When paint fails here, water doesn’t just sit on the surface; it wicks into the end grain of the wood. This moisture eventually travels behind your siding and into the wall studs. Fresh, flexible paint creates a waterproof envelope that keeps your sub-structure bone dry and prevents the nightmare of expensive dry rot repairs.
The Pacific Northwest Moisture Challenge
Vancouver’s humidity creates a constant cycle of wood movement. Wood expands when it’s damp and shrinks when it dries out. This “breathing” causes cheap or old paint to crack and flake away. Even our summers pose a threat. Those intense July UV rays bake the wood, making it brittle and prone to splitting. A high-quality coat of paint serves as a sacrificial barrier that takes the damage so your expensive wood trim doesn’t have to.
Boosting Curb Appeal and Property Value
Protection is the priority, but style is the reward. Trim color defines the “bones” of your home. It creates sharp architectural lines that make a property look well-maintained and modern. Are you looking for a high return on investment? Refreshing your window frames and front door with a “pop” of color is one of the fastest ways to increase value. If you’re searching for residential painting near me, you likely already know that a crisp, clean trim job makes the whole neighborhood take notice.
Keeping up with trim maintenance provides several key benefits:
- Waterproofing: Seals the end grain of wood where rot starts.
- Structural Integrity: Prevents moisture from reaching the home’s framing.
- Visual Definition: Accents your home’s unique architectural features.
- Cost Savings: A few gallons of paint are much cheaper than replacing a roofline.
Identifying Key Areas: Fascia, Soffits, and Window Trim
Have you ever looked closely at the “skeleton” of your home’s exterior? Most people see the siding and the roof, but the trim is what ties everything together. Think of your trim as the frame on a painting. It provides the structure and the seal. When we talk about exterior trim painting Vancouver WA, we aren’t just talking about a quick decorative touch. We’re talking about protecting the most vulnerable transition points of your house.
Fascia boards are the heavy hitters of the roofline. These are the long, horizontal boards that run along the lower edge of your roof. They carry the weight of your gutters and take the first hit from every rainstorm. Soffits are the boards tucked underneath those eaves. While they stay out of the direct rain, they play a massive role in attic ventilation. If the paint on your soffits fails, moisture can get trapped in your attic, leading to mold and structural dampness. Window sills and door frames are your high-touch areas. They face constant friction from use and standing water from our frequent PNW drizzles.
Recognizing Early Signs of Trim Damage
Is your paint trying to tell you something? Look for “alligatoring.” This happens when the paint surface cracks into a pattern that looks like reptile scales. It’s a clear sign the coating has lost its ability to flex with the wood. Next, take a walk around with a firm touch. Do you find any soft spots? If the wood feels spongy near the corners of a window sill, you’re likely dealing with early-stage wood rot. Pay special attention to the areas near your downspouts. Peeling paint here often means your gutters are overflowing and soaking the wood repeatedly. If you see these signs, reaching out to a house painter for an inspection can prevent a small project from turning into a full-scale replacement.
Trim vs. Siding: Understanding the Technical Difference
Why can’t you just use the same paint everywhere? Trim and siding are different animals. Trim boards move and twist more than siding panels because they’re often made of thicker, solid wood. This is why we typically use a semi-gloss sheen for trim. It’s harder, more durable, and sheds water much faster than the flat finishes used on siding. Don’t overlook your corner boards either. These vertical strips seal the seams where two walls meet. A professional knows that sealing these corners is just as vital as the paint itself to keep the moisture out for good.
The Professional Trim Painting Process: Prep vs. Paint
Why do some homes stay crisp for a decade while others show flakes after just two winters? The answer isn’t usually the brand of paint. It’s the preparation. In the world of exterior trim painting Vancouver WA, we often say that 70% of the work happens before the first can of finish color is even opened. Trim work is meticulous. It requires specialized tools like angled sash brushes, detail sanders, and small-diameter rollers to reach into the tight corners of your fascia and window frames.
If we are replacing damaged boards, we always use a technique called “back-priming.” This means sealing the back side of the wood before it’s nailed to your house. Why? Because in our damp climate, moisture often gets behind the trim. If the back isn’t sealed, the wood will soak up water like a sponge and push the paint off from the inside out. Our standard sequence is a methodical five-step dance:
- Clean: Pressure wash or hand-scrub to remove mildew and dirt.
- Scrape: Strip away every loose or failing flake of old paint.
- Sand: Smooth the edges and scuff the surface for better grip.
- Prime: Create a chemical bond for the topcoat to adhere to.
- Paint: Apply two coats of high-performance finish for maximum depth.
Surface Preparation: Scraping and Sanding
Old, loose paint is the enemy of a long-lasting finish. We must remove every bit of failing material until we reach a “sound” surface where the existing paint is still firmly bonded. Sanding isn’t just about making things look smooth; it creates “tooth.” This microscopic texture gives the new primer something to grab onto. For homes built before 1978, we always perform lead-paint testing to ensure the safety of your family and our crew during the scraping and sanding process.
Caulking and Sealing for Longevity
Once the surface is smooth, we look for the gaps. These tiny cracks between your trim and siding are where driving rain enters your home’s envelope. We don’t use standard interior caulk here. We select high-stretch, “elastomeric” sealants designed specifically for the Pacific Northwest. These products can expand and contract without cracking as the seasons change. If you’re curious about how this fits into a full home project, check out our guide for exterior house painters to see the bigger picture of home protection.
Selecting the Right Materials for the Vancouver Climate
Choosing the right products for the Pacific Northwest isn’t just about picking a pretty color. It’s about chemistry. In our region, high-performance 100% acrylic latex paints have become the gold standard for durability. Why? Because they’re incredibly flexible. As your home’s wood trim expands and contracts with our fluctuating humidity, these paints stretch instead of snapping. This flexibility prevents the hairline cracks that allow moisture to sneak in and start the rotting process.
You’ve likely seen “self-priming” paints at the local hardware store. While these are fine for a quick interior touch-up, they often fall short for exterior trim painting Vancouver WA. Bare wood trim, especially after it’s been scraped and sanded, needs a dedicated primer to create a proper bond. Without it, the paint sits on the surface rather than anchoring into the wood grain. We also have to consider the sheen. While semi-gloss is the traditional choice because it sheds water effectively, many modern homeowners are moving toward satin finishes. Satin provides a more contemporary, velvety look that hides minor wood imperfections while still offering excellent moisture resistance.
Selecting Weather-Resistant Coatings
Modern paint technology has come a long way. Many of the high-performance lines we use, such as Sherwin-Williams Emerald or Benjamin Moore Aura, feature moisture-resistant technology that allows the paint to dry quickly even in high humidity. Another vital factor is “breathability.” A quality exterior coating allows microscopic water vapor to escape from inside the wood without causing the paint to blister or peel. If your home has classic cedar trim, we still rely on oil-based primers. Cedar contains natural tannins that can bleed through water-based products, creating unsightly brown stains. An oil-based seal keeps those tannins locked away forever.
Picking the Perfect Accent Colors
What’s trending in Vancouver for 2026? We’re seeing a shift away from stark, all-white exteriors toward nature-inspired palettes. Deep moody blues, sage greens, and warm charcoals are popular for creating a sophisticated look. Your trim color should coordinate with your siding while making your architectural features stand out. For example, using a crisp white trim against a dark gray body creates a sharp, clean line that defines your home’s “bones.” If you want to make a statement, try a bold contrast on your front door that complements your new trim color. Ready to see what these colors look on your home? Contact our professional painting contractor team to start your transformation today.
When selecting your materials, keep these factors in mind:
- UV Resistance: Choose high-quality pigments that won’t fade during our intense, sunny summers.
- Mildewcides: Ensure the paint contains additives to prevent green algae growth on shaded North-facing trim.
- Temperature Range: Some modern coatings can be applied in temperatures as low as 35°F, extending our painting season.
Why Professional Trim Painting with Brush Hour LLC is Your Best Move
Do you really want to spend your next three weekends on a 24 foot extension ladder? Painting fascia and soffits isn’t just tedious; it’s physically demanding and carries real safety risks. Reaching those high peaks while balancing a paint bucket and a brush is a challenge even for the most seasoned DIYer. When you choose professional exterior trim painting Vancouver WA, you aren’t just buying paint on wood. You’re buying peace of mind and the safety of staying firmly on the ground.
Our professional crews bring the right equipment, from specialized ladders to fall protection gear, ensuring the job is done safely and efficiently. What might take a homeowner a month of Saturdays, we can often complete in just a few days. This speed doesn’t mean we cut corners. It means we have the systems in place to prep, prime, and paint with surgical precision. Plus, as a licensed and insured contractor, we protect your property and our workers throughout the entire project. It’s a “done right the first time” investment that saves you from the high costs of fixing DIY mistakes later.
Local Expertise in Vancouver and Battle Ground
Choosing a local painting contractor who understands our specific environment is vital. We’ve been serving the Vancouver and Battle Ground communities since 2012, so we know exactly how our local cedar and fir trim react to the damp winters and dry summers. We don’t just apply paint; we apply years of experience in PNW-specific home protection. The “Brush Hour” promise is built on precise craftsmanship and a focus on professional reliability that our neighbors have come to trust.
Schedule Your Free Trim Painting Estimate
Are you unsure if your trim needs a simple refresh or a full board replacement? Our estimate process is designed to be more than just a price quote. We take a close look at your home’s “bones” to identify hidden wood rot or failing caulk before they become structural problems. We believe in a no-pressure, supportive approach that helps you make the best decision for your home. We’ll walk you through the process, from color selection to the final walkthrough, ensuring you feel confident in every step of your home’s transformation.
Working with Brush Hour LLC means you get:
- Safety First: We handle the high peaks and difficult rooflines so you don’t have to.
- Expert Diagnosis: We spot early signs of damage that DIYers often overlook.
- Long-Term Savings: A professional seal prevents the need for expensive structural repairs later.
- Peace of Mind: We are a fully licensed and insured team with over a decade of local experience.
Give Your Vancouver Home the Protection It Deserves
Your exterior trim is the first line of defense against our unique PNW weather. Whether it’s shielding your fascia from rain runoff or sealing window sills against moisture, high-quality exterior trim painting Vancouver WA is an investment that pays off in both beauty and structural safety. You’ve seen how the right materials and a detailed prep process can stop wood rot before it starts. Now, it’s time to turn that knowledge into action.
Don’t let peeling paint turn into a costly repair bill next season. Brush Hour LLC has been the helpful local expert for our neighbors since 2012. Our licensed and insured team is ready to handle the ladders and the logistics so you don’t have to. We’re here to be your supportive partner in keeping your home fresh and well-maintained. We’ve spent over a decade perfecting our process for PNW durability, ensuring your home stays protected for years to come.
Get a Professional Exterior Trim Painting Quote from Brush Hour LLC
We can’t wait to help you transform your home’s exterior with a finish that lasts.
Frequently Asked Questions
How often should I repaint the exterior trim on my house in Vancouver?
You should typically repaint your exterior trim every 7 to 12 years in our region. However, because trim boards like fascia and sills catch the most rain runoff, they often show wear before your siding does. Investing in regular exterior trim painting Vancouver WA ensures that you catch small cracks early. This prevents moisture from reaching the wood grain and causing expensive structural rot that can spread to your siding.
Can I paint my exterior trim if the wood is slightly damp?
No, you should never apply paint to damp wood. Even a small amount of trapped moisture will cause the new coating to bubble and peel within a few months. When performing exterior trim painting Vancouver WA, we recommend waiting at least 24 to 48 hours after a heavy rain before starting your project. This ensures the wood fibers are dry enough to allow the primer and paint to bond properly.
Is it better to paint trim with a brush or a sprayer?
We use a combination of both for the best results. While sprayers are efficient for covering large areas quickly, brushes are indispensable for trim work. Brushing allows a professional house painter to “back brush” the paint into the wood grain and ensure a thick, protective layer on sharp edges and corners. This manual application creates a more durable seal that stands up better to the constant friction and moisture our local homes face.
What is the best temperature for exterior trim painting in Washington?
The ideal window is between 50°F and 85°F with low humidity. In Washington, this usually means the prime season runs from May through October. While some modern weather adaptive paints can be applied in temperatures as low as 35°F, staying within the 50 to 85 degree range ensures the best curing process. Always check that the temperature won’t drop below the manufacturer’s recommendation for at least 24 hours after application.
Do I need to prime my trim before every new coat of paint?
You don’t always need a full coat of primer if the existing paint is in excellent condition. However, you must prime any bare wood, repaired sections, or areas where you’ve scraped away loose flakes. Priming is also vital if you’re making a major color change. It provides the necessary “tooth” for the topcoat to grab onto. Skipping this step often leads to poor adhesion and a finish that doesn’t last nearly as long.
What happens if I ignore peeling paint on my fascia boards?
Ignoring peeling paint on your fascia boards is an invitation for wood rot. These boards sit directly under your gutter line and are the first point of contact for overflowing water. Once the paint seal breaks, moisture wicks into the wood and can travel into your roof rafters or attic. What starts as a simple painting touch up can quickly turn into a massive structural repair involving your entire roofline and gutter system.
Should the trim be lighter or darker than the siding?
Both styles are popular in the Vancouver area. Lighter trim, like classic white or cream, provides a crisp and traditional look that makes architectural details pop. Darker trim, such as charcoal or deep navy, offers a modern and sophisticated aesthetic that can make a home feel more grounded. The most important factor is creating enough contrast with your siding so the architectural lines of your home are clearly defined and visually interesting.
How much does professional exterior trim painting typically cost?
The cost for exterior trim painting Vancouver WA depends on several factors. We look at the linear footage of the trim, the height of the rooflines, and the required preparation. Since surface preparation accounts for 40% to 60% of the total effort, homes with peeling paint will require more labor. Getting a detailed estimate from a professional painting contractor is the best way to understand the specific investment needed for your property.