
What if the secret to a high-end home refresh isn’t a massive renovation, but simply the architectural “frame” around your rooms? You’ve likely noticed how yellowed, chipped baseboards or those frustrating DIY brush marks can make even a clean room feel a bit tired. It’s a common headache for homeowners who want a polished look but feel overwhelmed by which sheen will actually survive the kids and pets. Does your trim need a serious update? We understand that frustration completely.
Investing in professional interior trim painting Vancouver WA can completely change the energy of your space. It delivers those razor-sharp lines and a durable finish that stands up to daily life while instantly modernizing your aesthetic. As local experts serving the community for over 14 years, we’ve seen how this one detail can even boost your home’s value before a potential sale. In this guide, you will discover how to choose the perfect finish, the importance of expert prep work, and how to achieve a flawless result that lasts for years. Let’s get your home looking its absolute best again.
Key Takeaways
- Learn how crisp, clean trim acts as a visual anchor to modernize your space and increase your home’s overall value.
- Discover the right sheen and color trends for interior trim painting Vancouver WA to ensure a durable, stylish result that lasts.
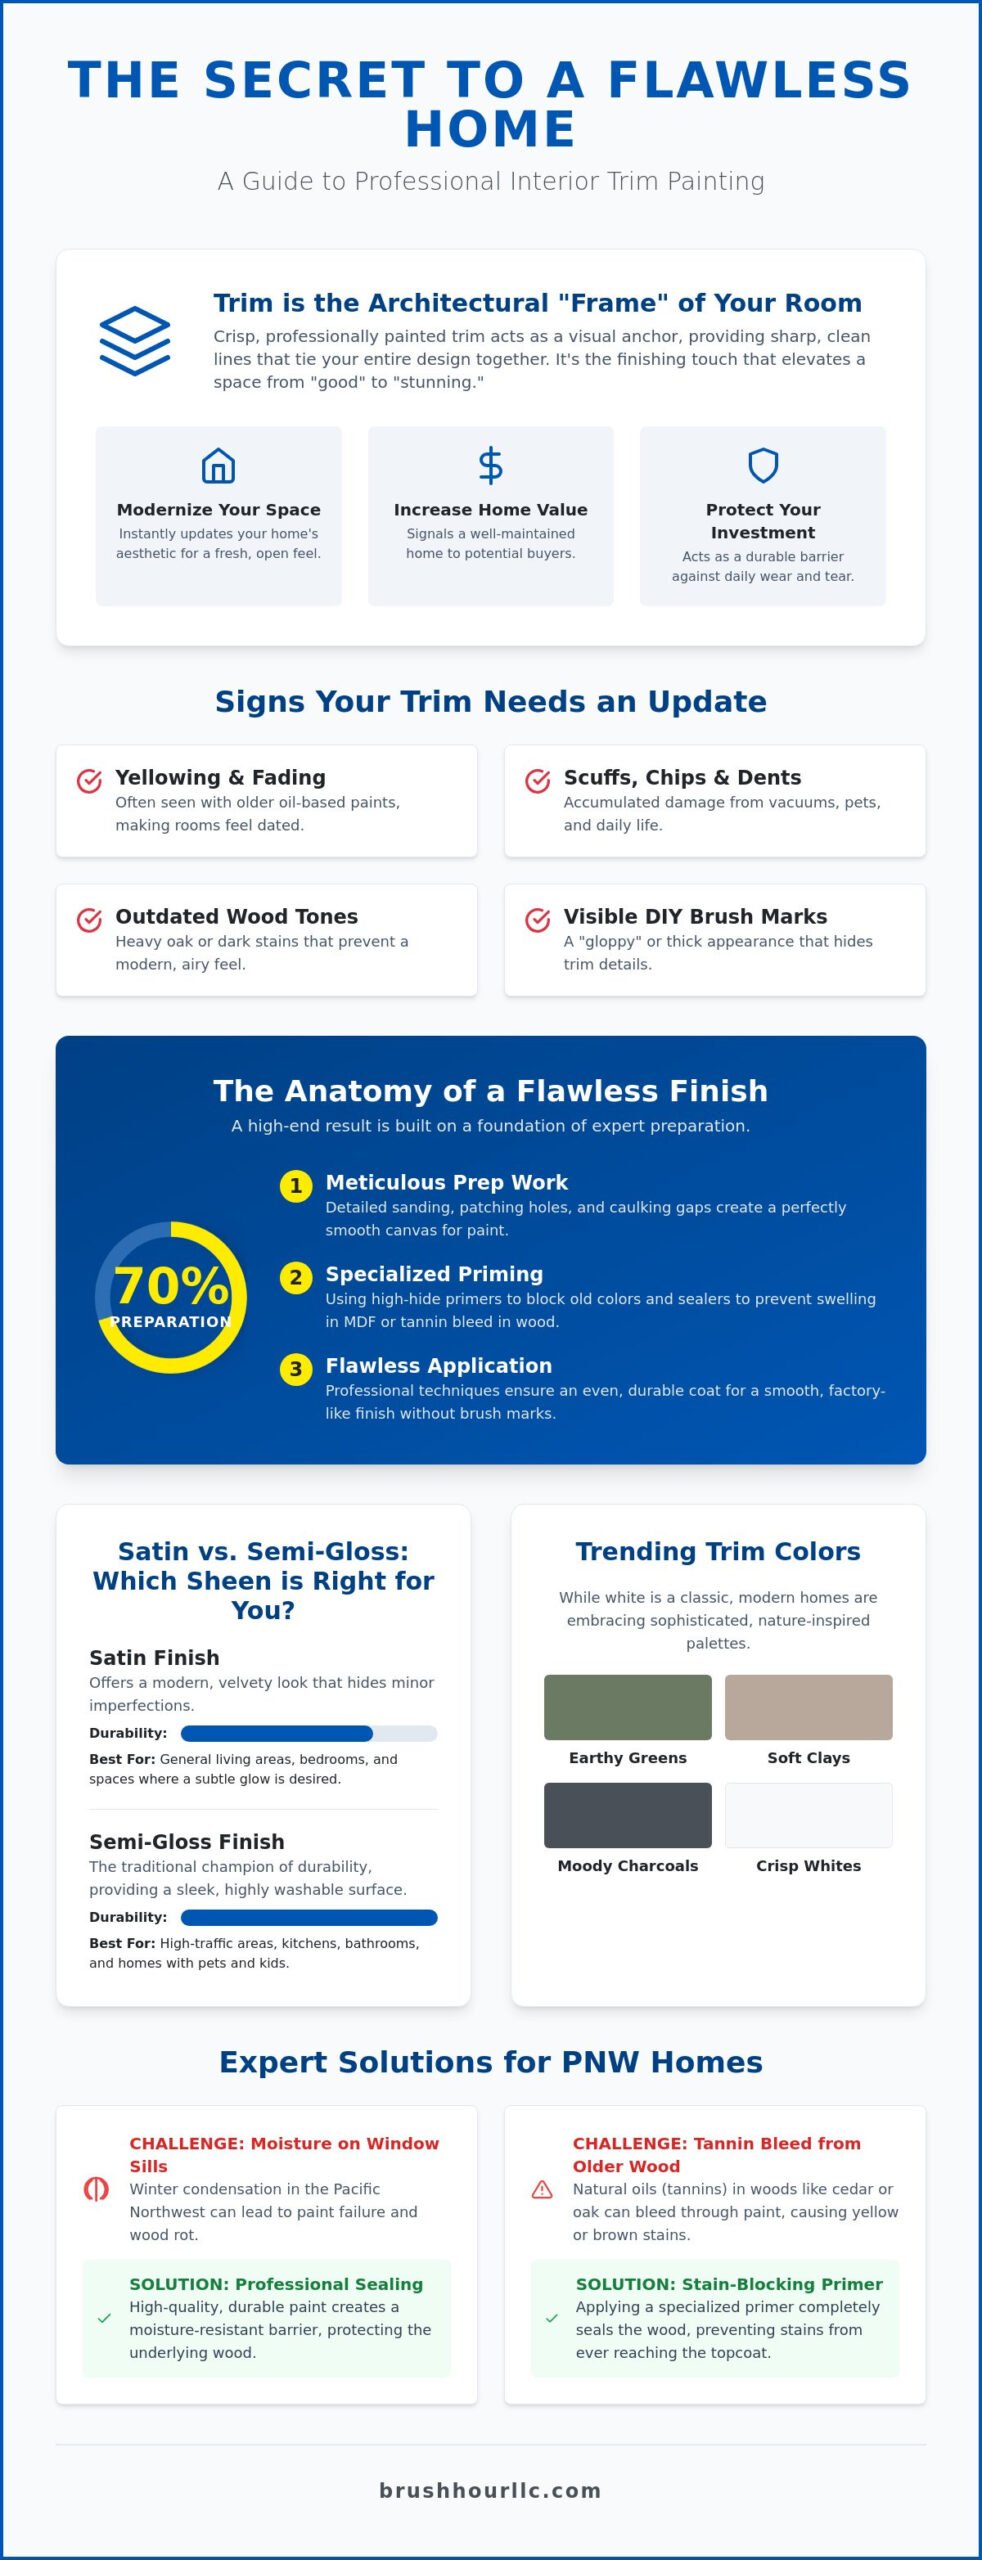
- Understand why professional preparation, including detailed sanding and patching, is 70% of the work required for a high-end look.
- Find specific solutions for local PNW challenges like moisture on window sills and tannin bleed from older wood trim.
- Save time and avoid the hidden costs of DIY by partnering with a local expert for high-precision, long-lasting results.
Why Interior Trim Painting is the Secret to a Modern Vancouver Home
Why is this so important? Crisp trim acts as a visual anchor for the entire room. It provides a clean, sharp border that separates your walls from your floors and ceilings. When these lines are perfect, the whole room feels more intentional and polished. If you are preparing for a sale, this detail is crucial for interior showings. Potential buyers notice scuffed or yellowed trim immediately, as it often signals a home that hasn’t been properly maintained over the years.
Is your trim showing its age? Look for common signs like yellowing, which is typical for older oil-based paints, or deep scuffs from years of foot traffic. Even an outdated color, like the heavy oak tones from decades ago, can hold your home back from achieving a modern, airy look. A professional refresh removes these distractions and lets your home’s architecture shine.
The Aesthetic Impact of Professional Trim Lines
Clean lines do more than just look pretty. They can actually change how you perceive a room’s size. In many Battle Ground homes with smaller footprints, bright, professional trim makes the space feel significantly larger and more open. There is a genuine psychological relief that comes with this sense of “freshness.” It revitalizes the home without the need for a full-scale renovation. Why do DIY attempts usually fall short? Most homeowners end up with “thick” or “gloppy” results that obscure the beautiful details of the molding. Professionals understand how to use different paint sheens to create a smooth, factory-like finish that highlights the wood’s profile.
Protecting Your Architectural Investment
Trim serves a purpose beyond aesthetics. It acts as a shield for your wall corners and the edges of your flooring. In the Vancouver area, high-quality paint on window casings is your first line of defense against wood rot caused by winter condensation. Your interior trim is the primary barrier against the daily wear and tear of pets, kids, and vacuum cleaners.
Choosing the Best Finishes and Colors for Your Trim
Are you stuck between “White Flour” or “Simply White”? Choosing a color is often the hardest part of interior trim painting Vancouver WA. While white remains a classic choice for many, we’re seeing a massive shift toward warmer, nature-inspired palettes in local homes. Earthy greens, soft clays, and even “moody” charcoals are becoming the new standard for high-end refreshes. These colors add a layer of sophistication that traditional white simply can’t match.
How do you make sure your trim doesn’t clash with your walls? It’s all about balance and flow. If you’ve recently invested in professional wall painting, your trim should either offer a crisp contrast or a subtle, tonal shift. To get those deep, rich colors to look right, we always use high-hide primers. These specialized coatings ensure that the old color doesn’t peek through and ruin the new aesthetic, especially when moving from a dark wood stain to a lighter paint color.
MDF vs. Solid Wood: Does Your Material Change the Paint Plan?
Does the material of your trim actually change the plan? Absolutely. Most modern homes in Vancouver use MDF (Medium Density Fiberboard). It’s smooth, but it acts like a sponge. If you use the wrong water-based product without the right sealer, it can swell and ruin the molding. On the other hand, many historic homes in our area feature solid oak or cedar. These older woods often have layers of old stain or even lead-based paint. In these cases, we strictly follow lead-safe work practices to keep your family protected during the prep phase. Different substrates require different primers to ensure the paint actually sticks for the long haul.
Selecting the Right Sheen for High-Traffic Areas
Which finish is best for your lifestyle? This usually comes down to semi-gloss versus satin. Semi-gloss is the traditional champion of durability. It’s incredibly easy to wipe down after a muddy dog or a toddler with a sticky hand. However, many homeowners are now opting for satin. It offers a more modern, velvety look that hides minor wood imperfections better than a high-shine finish. We typically recommend semi-gloss for baseboards and door casings while using satin for crown molding to reduce light glare from your ceiling fixtures. If you’re feeling overwhelmed by the options, you can always consult with a local expert to see how these sheens look in your specific home lighting.
The Professional Trim Painting Process: How We Achieve Flawless Results
Why does professional work look so much different than a weekend DIY project? The secret isn’t just a steady hand. It’s the preparation. For high-quality interior trim painting Vancouver WA, we follow a “prep-first” philosophy. In our world, 70% of the job happens before the brush ever touches a drop of paint. If you skip the groundwork, even the most expensive paint will eventually peel or show every minor imperfection in the wood.
One of the most overlooked steps is sanding. We don’t just sand to make the surface feel smooth. We sand to create what’s called a “mechanical bond.” By lightly scuffing the existing finish, we create a microscopic texture that allows the new coating to “bite” into the surface. This ensures your new finish won’t flake off when it’s inevitably bumped by a vacuum or a rogue toy. While understanding color theory in interior design helps you choose a stunning palette, our technical process ensures those colors actually stay on your walls for years to come.
The Critical Importance of Caulking and Patching
Have you noticed those tiny nail holes or the dark gaps where your crown molding meets the ceiling? These are the “tells” of an aging home. We spend hours patching every single nail hole and filling separated joints. In our local climate, we use high-flexibility caulk designed to withstand the fluctuating PNW humidity. This prevents the beads from cracking when your home naturally expands and contracts. Caulk provides the seamless transition between wall and wood. Without this “magic step,” your trim looks like an afterthought rather than a built-in architectural feature.
Achieving a “Brush-Free” Finish
Common Trim Challenges in Vancouver & Battle Ground Homes
Living in the Pacific Northwest brings a unique set of challenges to your home’s interior. Have you noticed black spots or peeling paint on your window sills after a long, wet winter? This is a frequent issue for homeowners in our area. Moisture from window condensation often leads to mildew growth and paint failure on the very surfaces meant to protect your home. Addressing these issues during your interior trim painting Vancouver WA project is essential for a result that actually lasts.
Another common headache is “tannin bleed.” If you are painting over old cedar or oak trim, those natural wood oils can seep through your new paint, leaving behind unsightly yellow or brown stains. You can’t just cover this with standard latex paint. It requires a specific blocking primer to seal the wood. We also frequently see “alligatoring” or bubbling, which usually happens when a previous painter applied new paint over old, glossy oil-based finishes without proper prep. We take the time to strip back these failed layers to ensure your new finish is smooth and stable.
Do you live in one of Vancouver’s beautiful historic neighborhoods? If your home was built before 1978, lead-based paint is a serious consideration. This isn’t something you should sand down yourself. We follow strict safety protocols to ensure any old lead layers are handled correctly, protecting your family’s health while we modernize your space. If you’re ready to fix these common local issues, you can contact our expert team for a professional assessment.
Humidity and Your Interior Paint
Our wet climate doesn’t just stay outside. High indoor humidity levels during Vancouver winters can significantly affect how paint dries and sticks to your trim. If the environment is too damp, the paint may never fully cure, leading to a “sticky” finish that attracts dust. We use moisture-resistant paints in high-risk areas like bathrooms and kitchens. These specialized products provide an extra layer of defense against the steam and splashes of daily life, keeping your trim looking fresh for years.
Upgrading Outdated Stained Wood to Modern Painted Trim
Is your home still rocking the honey oak look from the 1990s? Many houses in Battle Ground feature heavy wood stains that can make a room feel dark and dated. To transition from stain to a modern “greige” or soft white, we use a meticulous de-glossing process. You can’t simply paint over old varnish; the new layer will slide right off. We apply specialized bonding primers that bridge the gap between old-school stains and modern coatings. This single change is often the most effective way to make an older home feel brand new again.
Investing in Your Home: Why Professional Trim Painting Pays Off
Is it really worth hiring a pro for just the baseboards and door frames? Absolutely. When you look at the cost-benefit analysis, the “hidden costs” of a DIY project add up fast. Think about the high-quality brushes, specialized sanders, and premium primers you would need to buy. Then, consider the value of your own time. Interior trim painting Vancouver WA is a precision-based task that can easily swallow three or four of your weekends. By hiring a painting contractor, you aren’t just paying for paint on wood. You are investing in efficiency and a level of detail that is nearly impossible to achieve without professional-grade equipment.
Our results are built to last. While a quick DIY coat might start peeling or yellowing in a year or two, our professional applications are designed to look stunning for 5 to 10 years. We use industrial-strength coatings that stand up to the vacuum bumps and pet scuffs common in active Vancouver and Battle Ground households. It’s the most cost-effective way to refresh your home’s interior without the price tag of a full remodel.
The “Relief” Factor: Handing Off the Tedious Work
Why is trim work so exhausting? It’s the most physically demanding part of any interior project. It requires hours of kneeling, bending, and focusing on tiny details. Handing this work off to us provides immediate emotional relief. You get to skip the back pain and the frustration of “gloppy” paint corners. Plus, there is an incredible peace of mind that comes with having a licensed and insured team in your home. We’ve spent over 14 years refining our process to minimize disruption to your daily life. We show up on time, keep a clean workspace, and let you get back to enjoying your home faster.
Ready to Transform Your Home?
Refreshing your trim is the secret to making your entire house feel intentional and high-end. It’s the architectural jewelry that makes your wall colors pop and your floors look cleaner. At Brush Hour LLC, we take pride in being your “helpful local expert” across Clark County. We don’t just slap on a coat of paint; we partner with you to ensure the finish, color, and durability meet your family’s specific needs. If you’re planning a larger project, be sure to check out our interior house painters guide for more expert tips. Ready to see the difference professional precision makes? Let’s get started on your home transformation today.
Ready to Frame Your Home in Perfection?
Are you ready to see your living space in a whole new light? We’ve explored how the right sheen protects your architectural investment and how professional prep work solves local humidity challenges. You now know that interior trim painting Vancouver WA is about more than just a fresh color. It’s about precision, durability, and the relief of letting a trusted partner handle the tedious details. Why settle for visible brush marks when you can have a factory-smooth finish?
As a licensed and insured team with over 14 years of local experience, we understand the specific needs of Clark County homes. We take pride in our 5-star rated service and our commitment to making your home refresh as smooth as possible. Your home deserves a high-end look that lasts for years. Are you ready to take the next step? Get Your Free Interior Trim Painting Estimate from Brush Hour LLC today. Let’s work together to make your home feel brand new again.
Common Questions About Interior Trim Painting
How much does it cost to paint interior trim in Vancouver WA?
The total investment for interior trim painting Vancouver WA depends on several key factors, including the linear footage and the complexity of your molding. Intricate crown molding or detailed door casings require more precision and time than standard baseboards. We also look at the current condition of the wood, as surfaces requiring extensive sanding or patching will naturally involve more labor to ensure a high-end finish.
How long does it take for interior trim paint to dry and cure?
Most high-quality paints are dry to the touch within one to two hours, but a full cure can take up to thirty days. While you can walk through the room or touch the trim shortly after we finish, it’s best to avoid heavy cleaning or bumping the surface for the first few weeks. Our local PNW humidity can sometimes extend these drying times, so we adjust our process to ensure the paint sets perfectly.
Can you paint over stained wood trim without sanding it first?
You can’t successfully paint over stained wood without proper preparation, as the new coating won’t stick to the old, glossy varnish. We use a combination of light sanding and specialized bonding primers to create a surface the paint can actually grip. This meticulous step prevents peeling and ensures your new color looks professional and stays durable for the long haul.
What is the best paint sheen for baseboards and door frames?
Semi-gloss is the most popular choice for baseboards and door frames because it’s incredibly easy to clean and resists daily scuffs. If you prefer a more modern, velvety look, satin is an excellent alternative that hides wood imperfections better than high-shine finishes. We often recommend semi-gloss for high-traffic areas where pets and kids are most active to ensure the best durability.
Do I need to empty my rooms before the painters arrive?
You don’t need to completely empty your rooms, but we do ask that you move smaller items, electronics, and breakables to a safe area. Larger furniture can usually stay in the room if it’s moved to the center to give us clear access to the perimeter. We take care of all the masking and protection for your floors and remaining furniture to keep your home spotless during the project.
What happens if my trim has lead paint?
If your home was built before 1978, we test for lead and follow strict Washington State lead-safe work practices if it’s present. This involves specialized containment and cleaning methods to protect your family from dust exposure during the prep phase. It’s a vital safety step that ensures your home refresh is both beautiful and healthy for everyone living inside.
Is it better to paint trim or walls first?
Professional painters typically paint the trim first and then move to the walls. This approach allows us to be a bit more generous with the trim paint and then come back with the wall color to create those perfectly straight lines. It’s the most efficient way to achieve the crisp, “cut-in” look that defines a high-quality professional finish.